At 6 years and 95K miles on my car, the first bulb (of any type) finally burned out: The driver's side low-beam. My car lacks DRLs, so I drive with my low-beams on all the time, meaning the bulbs had been operating for every one of those 95K miles driven over those 6 years.
Not bad for a tungsten-halogen bulb, right?
Leading up to this I had been thinking I was losing my night vision, as the headlights seemed dimmer and more orange. Turns out a large part of that was the bulb actually dimming and turning more orange: While the halogen gas within the bulb massively reduces the rate at which tungsten vaporizes off the hot filament, it doesn't zero it. And what does come off makes its way to the cooler glass walls, slowly making them darker and acting as a filter that preferentially blocks shorter light frequencies, leading to both the dimming and the orange-ing.
I jumped onto Amazon and ordered a pair of replacement halogen bulbs, knowing they'd be good to use. But a minute after pressing "Buy" I decided to check out LED replacements, just for comparison.
What I found surprised me, though it shouldn't have: LED bulbs putting out the same light as 55 watt halogen bulbs use 1/10 the power! At the other extreme, I could get 10x the light for the same power!
I canceled my order to give me time to think about this. Would LED bulbs be a better way to go?
The first decision concerned what power level to get. While the halogen bulbs used 55 watts, none of the LED bulbs got close to that, maxing out at about 40 watts for ones that could illuminate the moon. And some very powerful, popular, and highly-rated bulbs were available for barely over $20 per pair.
But in the pictures they all looked way bigger and bulkier than I expected, making me wonder if I'd have enough room to install them.
It turns out they were big because all had fans in them, to keep the LEDs at a safe operating temperature. I immediately knew there was no way such tiny high-speed fans would last the next 95K miles. Some of the bulbs even advertised having fans that were "easy-to-replace". Not really a good sign.
So I searched for "fanless LED headlight bulbs", and the results were more to my liking. I chose the highest-rated of the mid-priced ones, which cost $31 for the pair, compared to the $11 for the halogen replacement bulbs. The LED bulbs consumed only 8 watts each, but put out nearly 3x the light of the original halogen bulbs. So, 3x the light for 3x the price (and 1/7 the power) sounded like a good value to me.
I placed the order, they arrived the next day, and I installed them that evening. The difference was, well, like night and day. The higher color temperature reveals much more color at night, and the reflective paint on the road and signs was visible at least 4x further away.
I immediately felt safer. And my eyes worked just fine.
If you're still driving on tungsten-halogen low-beams, please stop! The upgrade to LED bulbs is well worth it from a safety standpoint alone.
Wednesday, October 31, 2018
Saturday, September 15, 2018
Yes, my new curved 65" 4K TV is also my HTPC monitor!
My old 42" TV/monitor was fading. Literally. It had a cold-cathode fluorescent backlight that was showing its age. Even at full brightness, it was becoming an issue in a day-lit room.
So I measured the place it occupied, and decided to get the biggest TV that would fit, which turned out to be 65" (1.65m) diagonal.
I also wanted to get a curved screen, because I sit relatively close to my TV/monitor (2-3 meters), and the angle to the corners of a flat screen had a clearly different appearance (a combination of dimming and color shift), so I wanted the corners to be aimed more toward me.
That was over two years ago, and that TV had only become worse since. But I'm a cheapbas, uh, person, and I didn't want to pay the prices for even the cheapest curved 65" TVs available. I also didn't want or need a "smart" TV, but that was a basic feature of all curved TVs.
So I waited. And waited. About a year ago it became clear that the curved screen "fad" had peaked, and fewer models were being offered. Then the generic brands started to release curved TVs, but their initial efforts were truly terrible.
Earlier this year Sceptre introduced their second-generation curved screen (the C650 series), and it seemed to be the best of all the generic brands. I give it a few months for reviews from reputable review sites to be posted, but none ever were! It was as if this TV was too cheap to be worth their time.
The largest distributor was Walmart, which only sells things that make them money, meaning few returns for any reason. So I started reading user reviews, and was impressed by how few flaws were revealed.
I continued to wait, hoping for a sale of some kind. The price gradually drifted lower, but only a little. When it didn't go on sale for Labor Day, I finally decided to pull the trigger, and ordered the Sceptre C658 for US$500. I bought it on Amazon, but from Walmart, since Amazon also offered an awesome 4-year warranty extension for $25: The cheaper something is, the more important it becomes to get an extended warranty.
I ordered not only the TV, but also an Amazon Fire TV Cube, which was on sale for $79. The main reason for that was I had no source of 4K content: My HTPC is a powerful but rather old i5 with internal graphics and a video resolution that tops out at 1080p60. And I'm too cheap to upgrade it with a new video card, when I really should upgrade the whole machine.
I got a text Friday that FedEx had made the delivery, so I headed home during lunch to get it indoors and off the driveway. It was more bulky than heavy. I immediately unboxed it and plugged it in to the Fire TV Cube that had arrived the day before, and was greeted with wonderful 4K video, with a very bright screen and zero bad pixels.
The bloody thing is huge in size, but doesn't weigh all that much more than the 42" TV it replaced.
I spent Friday evening getting everything connected and tested, with no problems whatsoever.
Best of all, it finally made all my other equipment play nice together: My old TV had an early version of CEC, and didn't really play well with my other equipment. Now my Sony AV receiver, LG DVD player and Dell HTPC all happily play with this Sceptre TV.
What's weird is I can use any remote to control everything. The Fire TV Cube is the hardest to use, because I still don't have the right Alexa skills configured. But the Sony AV remote can control the TV, and the TV remote can control both the Sony and the LG. I haven't yet tried using the LG remote because I can't find it.
As for the video quality, I'm not much of a judge, but it looks beyond awesome to me. The TV does very good upsizing of 1080p to 4k, with only a few tiny motion artifacts occasionally being visible. Of course, those artifacts could have been there all along, but my old TV was unable to let me see them.
I've been watching some 4K content on Amazon Prime, and I have to say, bigger is better. The 4K resolution itself isn't a big deal for me where movies are concerned, only looking slightly better than 1080p to me. But sitting so close to that huge curved screen makes movies more immersive, and much more watchable and enjoyable.
Surfing the web is also much easier, as the bigger and brighter screen is much easier on the eyes. I hadn't realized just how small and dim my old TV really was.
This is SO much better, and a very worthy investment that I hope will last longer than the extended warranty!
So I measured the place it occupied, and decided to get the biggest TV that would fit, which turned out to be 65" (1.65m) diagonal.
I also wanted to get a curved screen, because I sit relatively close to my TV/monitor (2-3 meters), and the angle to the corners of a flat screen had a clearly different appearance (a combination of dimming and color shift), so I wanted the corners to be aimed more toward me.
That was over two years ago, and that TV had only become worse since. But I'm a cheap
So I waited. And waited. About a year ago it became clear that the curved screen "fad" had peaked, and fewer models were being offered. Then the generic brands started to release curved TVs, but their initial efforts were truly terrible.
Earlier this year Sceptre introduced their second-generation curved screen (the C650 series), and it seemed to be the best of all the generic brands. I give it a few months for reviews from reputable review sites to be posted, but none ever were! It was as if this TV was too cheap to be worth their time.
The largest distributor was Walmart, which only sells things that make them money, meaning few returns for any reason. So I started reading user reviews, and was impressed by how few flaws were revealed.
I continued to wait, hoping for a sale of some kind. The price gradually drifted lower, but only a little. When it didn't go on sale for Labor Day, I finally decided to pull the trigger, and ordered the Sceptre C658 for US$500. I bought it on Amazon, but from Walmart, since Amazon also offered an awesome 4-year warranty extension for $25: The cheaper something is, the more important it becomes to get an extended warranty.
I ordered not only the TV, but also an Amazon Fire TV Cube, which was on sale for $79. The main reason for that was I had no source of 4K content: My HTPC is a powerful but rather old i5 with internal graphics and a video resolution that tops out at 1080p60. And I'm too cheap to upgrade it with a new video card, when I really should upgrade the whole machine.
I got a text Friday that FedEx had made the delivery, so I headed home during lunch to get it indoors and off the driveway. It was more bulky than heavy. I immediately unboxed it and plugged it in to the Fire TV Cube that had arrived the day before, and was greeted with wonderful 4K video, with a very bright screen and zero bad pixels.
The bloody thing is huge in size, but doesn't weigh all that much more than the 42" TV it replaced.
I spent Friday evening getting everything connected and tested, with no problems whatsoever.
Best of all, it finally made all my other equipment play nice together: My old TV had an early version of CEC, and didn't really play well with my other equipment. Now my Sony AV receiver, LG DVD player and Dell HTPC all happily play with this Sceptre TV.
What's weird is I can use any remote to control everything. The Fire TV Cube is the hardest to use, because I still don't have the right Alexa skills configured. But the Sony AV remote can control the TV, and the TV remote can control both the Sony and the LG. I haven't yet tried using the LG remote because I can't find it.
As for the video quality, I'm not much of a judge, but it looks beyond awesome to me. The TV does very good upsizing of 1080p to 4k, with only a few tiny motion artifacts occasionally being visible. Of course, those artifacts could have been there all along, but my old TV was unable to let me see them.
I've been watching some 4K content on Amazon Prime, and I have to say, bigger is better. The 4K resolution itself isn't a big deal for me where movies are concerned, only looking slightly better than 1080p to me. But sitting so close to that huge curved screen makes movies more immersive, and much more watchable and enjoyable.
Surfing the web is also much easier, as the bigger and brighter screen is much easier on the eyes. I hadn't realized just how small and dim my old TV really was.
This is SO much better, and a very worthy investment that I hope will last longer than the extended warranty!
Saturday, May 26, 2018
Monoprice Mini Delta 3D Printer
There I was, stranded between two sources of 3D printing pain.
First, my only 3D printer was the horribly slow 101Hero, which insists on revealing more of its limitations as my skills have grown.
Second, nearly a year ago I backed the BuildOne 3D printer Kickstarter campaign. Production and delivery are 6 months late at this point (due to bad part vendors that in turn caused a complete printer redesign), though I expect to have it before the end of this year.
But that's way too long to persist with the 101Hero, which was only meant to be a disposable "training wheels" printer.
Last week I snapped. I desperately needed to print faster than the 10 mm/sec (yes, that's right) best rate I was seeing on a printer that had lousy positioning accuracy. It was ruining over half of my prints, and that's accounting for the great strides I've made in getting past many of the 101Hero's other limitations.
I really wanted my next printer to be a Creality CR-10, but I didn't want to order one just yet. I really wanted another small printer, just one that would print faster and better.
On paper, the $159 Monoprice Mini Delta (MPMD) was exactly the machine I wanted: A small fast delta that included a heated bed, a color LCD control panel and even WiFi support. It arrived 3 days after I placed my order, and I had started the test print provided on the uSD card less than 30 minutes after first touching the box. There was literally no setup to do other than getting it out of the box, loading the filament, inserting the provided uSD card, and plugging it in.
The test print, a waving cat (that didn't wave), came out perfect!
My next task was to configure Cura for the MPMD. This proved to be unexpectedly cumbersome, since no Cura configuration was provided that would work with the latest Cura (3.3.1). Cura version 15.04.6 is included on the uSD card, but it lacks features I've come to rely upon. The Cura configuration was soon complete, thanks to the abundant community help online, which is fortunate since Monoprice support seems not to exist (or, more likely, is overwhelmed).
I loaded up the STL for the single-layer delta calibration print I've been using with the 101Hero, scaled it to fit the MPMD, saved it to the uSD card, then started the print.
I watched the system first warm up the bed then the hot-end (done in sequence to limit power supply loading), Next I saw the system do it's auto-leveling process (double taps near each tower). Then I watched the effector slam into the print bed and start digging gouges into the bed's plastic surface. It took me a moment to figure out how to abort the print, during which time more ruts were dug.
Were I thinking a little faster, I would have simply cut the power instead. Which would have required pulling the cord, since the MPMD has no power switch. Something that even the crippled 101Hero has!
A tiny bit more research revealed the MPMD "auto-leveling" feature is completely broken. There is a work-around, but it requires repositioning the end-stops to be within a fraction of a millimeter of each other. Which I did, over and over again, for nearly an hour, with much cursing.
After which I had to update the Cura printer start gcode to use a slightly different auto-level command that was far more reliable than the one recommended by Monoprice.
And that was the end of the major drama. My MPMD has been printing nearly non-stop since then, with great results.
But not perfect! Most of the print defects are due to the MPMD's floating print bed: It literally rests on top of three spring switches that are used for auto-leveling, which, despite having alignment pegs, means the bed has nearly 1 mm of sideways slop, which is enough to create a noticeable layer shift.
The MPMD has other minor imperfections. The first is the noise. Even when not running, the fan in the bottom is surprisingly loud. I modified a 60 mm fan mount design that is in the queue for printing. The noise gets far worse when printing, mainly due to the bushings on the steel rods. My plan is to clean them then lubricate with lithium grease.
The final significant noise source is conducted sound from the steppers. I haven't yet selected a remedy for that, mainly because there are so many to choose from! There are sound-isolating mounts, stepper smoothers, and switching to improved driver chips, such as the Trinamic drivers. There are also things the slicer can do to reduce noise, starting with the acceleration, but also by limiting travel speed. I'll try those first.
As I learn more about 3D printing, I want to twist more of the knobs. On a Marlin system I can permanently tweak the configurations in the source code, and can tweak settings stored in EEPROM, as well as tweak settings during each individual print. The MPMD doesn't use Marlin, though the gcode does appear to be very compatible.
The display on a Marlin system can be used to tweak many settings while the printer is printing, making it much faster and easier to get things dialed-in. The MPMD display does permit a few things to be tweaked, but almost none compared to Marlin. Still, the MPMD display does all the basics quite well, and does so while looking fantastic. It's really great to have a printer display I can read from across the room!
One odd thing is the location of the spool holder onthe back of the printer: The filament has to take a needlessly tortuous path to the extruder I printed a quick bracket that lets my use a paint roller as a spool holder, placing the spool above and in line with the extruder, as well as closer to the printer's center of gravity. A paint roller really is an awesome spool holder.
That loud fan in the base also causes another problem: It blows air directly on the bed heater, meaning it takes longer for the bed to heat up. The hole under the bed heater is easily filled by printing a cup designed for the job, which I found on Thingiverse. The performance difference was immediately noticeable.
Once you adjust the limit switches and get auto-leveling to behave, the MPMD is truly a fantastic value, despite the other minor annoyances (all of which have solutions, or at least work-arounds).
Then again, I'm coming from a 101Hero: ANYTHING else would be a huge step up for me!
Sunday, April 29, 2018
Creating an External Power Monitoring app for Android
I needed to make a power monitoring system to let people know when the AC power to a critical pump had failed.
I realized an old cell phone would be ideal for this task, so long as it ran Android 4.4 (Kit Kat) or later. I found several phones between US$20 and US$30 that would do, and these were either fully-functional used phones, or in one case, a new phone! That's less expensive than a Raspberry Pi, and far more capable, as the phone already includes the cellular modem, the battery system, the display and the touchscreen, not to mention a whole bunch of other sensors and capabilities.
A cheap cell phone is an awesome platform!
The phone would always be plugged into its charger, and the charger would be plugged in to the AC power system to be monitored. When the phone charger loses power, a text would be sent, and another would be sent when power was restored. The only UI needed was for the user to enter the phone number(s) to which the texts would be sent.
Being a Python rapid-development fanboi, I installed SL4A (via the QPython package in Google Play) and soon had a short console script running that did the basics of what was needed.

Simple, right?
Unfortunately, providing this simple script with a GUI and turning it into an installable Android application package (apk) was frustratingly difficult, so I decided to look elsewhere. But at least I now knew it was truly a trivial app, and I expected no significant barriers on the development side.
I installed Android Studio, the standard Android integrated development environment (IDE), and was overwhelmed by the infrastructure needed to create even the simplest app. I'm primarily an embedded/real-time algorithm developer, so I'm used to programming very close to the hardware. There was nothing "simple" here! The Android platform is extremely capable, and is also quite complex.
One very pleasant surprise using Android Studio was my introduction to Kotlin, a language that pretty much eliminates the boilerplate verbosity and bloat of Java without losing any significant features, while delivering an elegant high-productivity language. I want more of this!
For fun, I also installed Visual Studio for Android, mainly to see if Xamarin's Mono would let me use Microsoft's excellent C# language to quickly develop my app. Again, I was unable to get even the simplest demo to load, much less build. And the full installation was nearly 60GB!
I had thought the best way forward would be to get a minimal demo app loaded and built, then modify it to meet my needs. I was beginning to think I had a real problem trying to do even a "simple" thing with these heavy-weight programming environments.
The other recommended Android development alternative was Eclipse for Android. But I've had an ambivalent off-and-on relationship with Eclipse for over a decade. When it works, it's sensational. But when it doesn't work it can be frustrating to remedy. So, no, I didn't bother to install it.
I really wanted a straightforward tool that would take code as simple as the Python above, then with a single click would generate a fully functional apk. I had no need to see behind the curtain, so I wanted a wizard to handle all that stuff for me.
A quick search brought me to App Inventor, the ex-Google now MIT project that used the Scratch programming environment that also has a simple drag'n'drop GUI editor. I had been wanting to play with Scratch anyway, since I plan to help with the local Scratch Day in May. This seemed like an excellent opportunity to meet multiple goals with a single project!
While everything initially went as planned, I soon found there were features of my app that App Inventor would not support. I then learned that App Inventor has not been receiving very much love, and there was little hope the shortcomings would be addressed any time soon.
I was delighted to find that the App Inventor code base (it's Open Source) had been cloned and improved by several groups, all of which could import App Inventor's "aia" project file format. A quick search brought me to Thunkable, where my app both built and ran as expected.
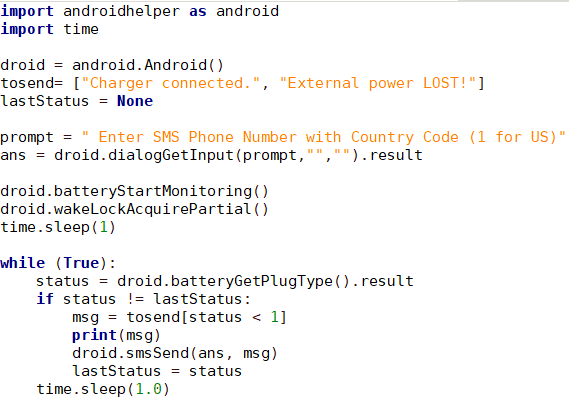
Here's the mockup of the app from the Thunkable GUI editor:

And here's the code that drives the above GUI, with some features added since the Python prototype. Yes, the code is an image: The Scratch language is itself graphical.

App Inventor and it's clones all share multiple ways to test your app: Via USB Debugging, via a WiFi interface app, and via a generated apk that can be installed by scanning a QR Code.
What could be easier!
The last piece of the puzzle was to get the Power Monitoring app to always launch when Android started. The Startup Manager app in Google Play was the right tool for the job, as well as also being able to prevent a slew of default phone apps from starting.
I realized an old cell phone would be ideal for this task, so long as it ran Android 4.4 (Kit Kat) or later. I found several phones between US$20 and US$30 that would do, and these were either fully-functional used phones, or in one case, a new phone! That's less expensive than a Raspberry Pi, and far more capable, as the phone already includes the cellular modem, the battery system, the display and the touchscreen, not to mention a whole bunch of other sensors and capabilities.
A cheap cell phone is an awesome platform!
The phone would always be plugged into its charger, and the charger would be plugged in to the AC power system to be monitored. When the phone charger loses power, a text would be sent, and another would be sent when power was restored. The only UI needed was for the user to enter the phone number(s) to which the texts would be sent.
Being a Python rapid-development fanboi, I installed SL4A (via the QPython package in Google Play) and soon had a short console script running that did the basics of what was needed.
Simple, right?
Unfortunately, providing this simple script with a GUI and turning it into an installable Android application package (apk) was frustratingly difficult, so I decided to look elsewhere. But at least I now knew it was truly a trivial app, and I expected no significant barriers on the development side.
I installed Android Studio, the standard Android integrated development environment (IDE), and was overwhelmed by the infrastructure needed to create even the simplest app. I'm primarily an embedded/real-time algorithm developer, so I'm used to programming very close to the hardware. There was nothing "simple" here! The Android platform is extremely capable, and is also quite complex.
One very pleasant surprise using Android Studio was my introduction to Kotlin, a language that pretty much eliminates the boilerplate verbosity and bloat of Java without losing any significant features, while delivering an elegant high-productivity language. I want more of this!
For fun, I also installed Visual Studio for Android, mainly to see if Xamarin's Mono would let me use Microsoft's excellent C# language to quickly develop my app. Again, I was unable to get even the simplest demo to load, much less build. And the full installation was nearly 60GB!
I had thought the best way forward would be to get a minimal demo app loaded and built, then modify it to meet my needs. I was beginning to think I had a real problem trying to do even a "simple" thing with these heavy-weight programming environments.
The other recommended Android development alternative was Eclipse for Android. But I've had an ambivalent off-and-on relationship with Eclipse for over a decade. When it works, it's sensational. But when it doesn't work it can be frustrating to remedy. So, no, I didn't bother to install it.
I really wanted a straightforward tool that would take code as simple as the Python above, then with a single click would generate a fully functional apk. I had no need to see behind the curtain, so I wanted a wizard to handle all that stuff for me.
A quick search brought me to App Inventor, the ex-Google now MIT project that used the Scratch programming environment that also has a simple drag'n'drop GUI editor. I had been wanting to play with Scratch anyway, since I plan to help with the local Scratch Day in May. This seemed like an excellent opportunity to meet multiple goals with a single project!
While everything initially went as planned, I soon found there were features of my app that App Inventor would not support. I then learned that App Inventor has not been receiving very much love, and there was little hope the shortcomings would be addressed any time soon.
I was delighted to find that the App Inventor code base (it's Open Source) had been cloned and improved by several groups, all of which could import App Inventor's "aia" project file format. A quick search brought me to Thunkable, where my app both built and ran as expected.
Here's the mockup of the app from the Thunkable GUI editor:

And here's the code that drives the above GUI, with some features added since the Python prototype. Yes, the code is an image: The Scratch language is itself graphical.
App Inventor and it's clones all share multiple ways to test your app: Via USB Debugging, via a WiFi interface app, and via a generated apk that can be installed by scanning a QR Code.
What could be easier!
The last piece of the puzzle was to get the Power Monitoring app to always launch when Android started. The Startup Manager app in Google Play was the right tool for the job, as well as also being able to prevent a slew of default phone apps from starting.
Sunday, March 18, 2018
Playing with the Equation for a Circle.
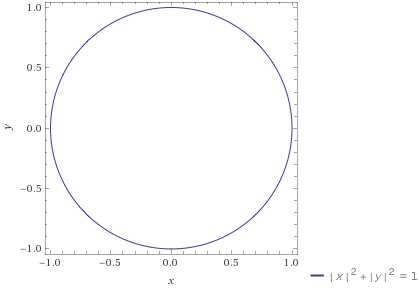
Most of us will immediately recognize the Cartesian form of the equation for a circle (typeset using The Online Equation Editor):

Please notice that the above is an "equation" in Cartesion coordinates, not a "function". There are various functional forms for the circle, such as in polar coordinates, but for the purposes of this post we'll stick with the above equation.
There are four "easy" points for this equation, which occur when each term of the equation is set to zero, in which case the other term is forced to take on values of +1 and -1 (the two real values whose squares equal positive one). These four points are called the "zeros" and occur at the following coordinates:
&space;=&space;(1,0),&space;(0,1),&space;(-1,0),&space;(0,-1) "(x,y) = (1,0), (0,1), (-1,0), (0,-1)")
Here's a plot of the above equation (courtesy of WolframAlpha):
 As expected, we have a circle with radius 1. Take a moment to verify that each of the zeros is indeed present.
Next, let's look at the "generalized" form of this equation, where the common exponent can take on other values:

This represents the family of equations where the exponent of x and y is the same. However, this form has some specific limitations we need to address before we start to play with values for n other than 2.
First, we need to constrain the equation to generate non-negative values so the sum is both real and bounded. For example, if n were odd, such as 3, then negative values of x and y would take on negative values when cubed, which in turn would force the other term to take on larger positive values to obtain the sum of positive 1, yielding a poorly-constrained result.
We will constrain the equation in three ways:
Here's the full form of our generalized, but constrained, equation:
&space;=&space;(-1..1,-1..1)\&space;and\&space;n&space;>0 "|x|^n + |y|^n = 1,\ where\ (x,y) = (-1..1,-1..1)\ and\ n >0")
To be sure we haven't created a monster, let's look at the plot of this equation for the case n = 2:
 Good! It's still a circle with radius 1.
Notice that the point (0,0) is still at the center, but for this plot I have chosen not to draw the conventional Cartesian axes through (0,0), but I instead used axis labels and legends at the sides of the plot. This was done not only to keep the plot itself as uncluttered as possible (which will become important later), but also to better depict the explicit bounds on x and y. Everything we do going forward will literally be "inside the box".
Ready to play?
Let's start with a look at the plot after setting n = 1:
 Whoa, a diamond? It makes sense when you think about it: This is a linear equation, so these are the four line segments connecting the zero points.
But how did the circle of n = 2 become the diamond of n = 1? Let's look at the plot for a value of n between 2 and 1, say n = 1.5:
 What's this? A "puffy diamond" or a "squeezed circle"? Notice that we obtained a plot for a value of n between 1 and 2 that has a mix of the characteristics for the plots of n = 1 and n = 2. This is not at all guaranteed, and the plots of many generalized equations fail to have this property as clearly evident as it is for this specific simple equation.
OK. So plots for values of n between 1 and 2 also "fall between" the plots for n = 1 and n = 2. What should we expect the plots for values of n < 1 to look like? Let's try n = 0.5:
 Cool! A star! Notice that our four zeros are still there. Also notice that as n has decreased from 2, the "corners" along the diagonals have steadily moved in. Another way to look at this is to view the portions of the plot near the zeros as getting "pointier" as n decreased.
Take a closer look at the legend accompanying the above plot: The exponent of 1/2 has been replaced with a square root radical. This should be a hint for describing the curve in each quadrant. Can you say what curve it is?
Let's look at the plot for a lower value, for n = 0.25:
 Yup, an even pointier star. Perhaps one with a twinkle? It follows our intuition that the plot should get "pointier" at the zeros as the value of n decreases.
What about the plots for n > 2? What does our intuition tell us? A n increases, we should expect the plot at the zeros to get rounder, and the plot diagonals to move further outward. Let's take a look for n = 3:
 What's this? A "square-ish circle" or "circle-ish square"? Actually, the set of plots for all n > 2 has it's own name: They're called "squircles".
Let's double n, and see what happens for n = 6. What do you think it will look like?
 Yup, it's getting more square. Notice that the sides aren't completely flat: They are still ever-so-slightly rounded. But it doesn't look quite like the "rounded squares" we may be used to, where the corners are simply rounded to a circular arc.
Are squircles of any use? In iOS 7, Apple switched their icon outline from a rounded rectangle to a squircle with n = 5:
 Not much of a difference from n = 6, but how about compared to a rounded rectangle?

Ah, see the difference? Which icon shape do you find to be most pleasing? Personally, I find the squircle more elegant, making the rounded square look to have corners at each end of each corner's arc.
Why did Apple make the change? Well, Apple may have wanted to make the change earlier, but it wasn't until iOS7 that most iPhones had screens with high enough resolution to make the difference visible enough to appreciate.
Finally, here's a plot combining the plots for n = {0.25, 0.5, 1, 1.5, 2, 3, 5}, making it more clear how the curves change with n and how the zeros are preserved:

Check Wikipedia and Google to find other uses of squircles. Have fun!
Please notice that the above is an "equation" in Cartesion coordinates, not a "function". There are various functional forms for the circle, such as in polar coordinates, but for the purposes of this post we'll stick with the above equation.
There are four "easy" points for this equation, which occur when each term of the equation is set to zero, in which case the other term is forced to take on values of +1 and -1 (the two real values whose squares equal positive one). These four points are called the "zeros" and occur at the following coordinates:
Here's a plot of the above equation (courtesy of WolframAlpha):
Next, let's look at the "generalized" form of this equation, where the common exponent can take on other values:
This represents the family of equations where the exponent of x and y is the same. However, this form has some specific limitations we need to address before we start to play with values for n other than 2.
First, we need to constrain the equation to generate non-negative values so the sum is both real and bounded. For example, if n were odd, such as 3, then negative values of x and y would take on negative values when cubed, which in turn would force the other term to take on larger positive values to obtain the sum of positive 1, yielding a poorly-constrained result.
We will constrain the equation in three ways:
- Apply the exponent to the absolute value of x and y, instead of the value itself. This will ensure the resulting exponentiation will always yield a positive value.
- Explicitly limit the values of x and y to be in the range of positive and negative 1.
- Limit n to be strictly greater than zero. Please explore for yourself why this is important, though it may be best to wait to do so until after reaching the end of this post.
Here's the full form of our generalized, but constrained, equation:
To be sure we haven't created a monster, let's look at the plot of this equation for the case n = 2:
Notice that the point (0,0) is still at the center, but for this plot I have chosen not to draw the conventional Cartesian axes through (0,0), but I instead used axis labels and legends at the sides of the plot. This was done not only to keep the plot itself as uncluttered as possible (which will become important later), but also to better depict the explicit bounds on x and y. Everything we do going forward will literally be "inside the box".
Ready to play?
Let's start with a look at the plot after setting n = 1:
But how did the circle of n = 2 become the diamond of n = 1? Let's look at the plot for a value of n between 2 and 1, say n = 1.5:
OK. So plots for values of n between 1 and 2 also "fall between" the plots for n = 1 and n = 2. What should we expect the plots for values of n < 1 to look like? Let's try n = 0.5:
Take a closer look at the legend accompanying the above plot: The exponent of 1/2 has been replaced with a square root radical. This should be a hint for describing the curve in each quadrant. Can you say what curve it is?
Let's look at the plot for a lower value, for n = 0.25:
What about the plots for n > 2? What does our intuition tell us? A n increases, we should expect the plot at the zeros to get rounder, and the plot diagonals to move further outward. Let's take a look for n = 3:
Let's double n, and see what happens for n = 6. What do you think it will look like?
Are squircles of any use? In iOS 7, Apple switched their icon outline from a rounded rectangle to a squircle with n = 5:

Ah, see the difference? Which icon shape do you find to be most pleasing? Personally, I find the squircle more elegant, making the rounded square look to have corners at each end of each corner's arc.
Why did Apple make the change? Well, Apple may have wanted to make the change earlier, but it wasn't until iOS7 that most iPhones had screens with high enough resolution to make the difference visible enough to appreciate.
Finally, here's a plot combining the plots for n = {0.25, 0.5, 1, 1.5, 2, 3, 5}, making it more clear how the curves change with n and how the zeros are preserved:

Subscribe to:
Posts (Atom)