I've been WFH for nearly a month, with less than two days total at the office. My home office has been unused for over a decade, and is totally unable to support anything close to the three 24" 1080p monitors I use at work.
The only suitable surface at home was the large table presently occupied by my 3D printers, and the laptop I use to run Cura to prepare the models for printing.
I first planned to duplicate my work setup and buy three 24" 1080p monitors for under $100 each. But what about after Personal Isolation and Social Distancing are over? Will I still want those three monitors?
I dashed into work (which was nearly deserted), grabbed the monitors from my desk, and gave it a try at home. It was totally impractical: I'd need to take my desk and chair too Cloning work wouldn't even work for work!
I had been wanting to learn 3D CAD, but it was an exercise in frustration on my laptop screen, even though it is a large 15.6" display. And it wasn't any better on three 24" screens.
So I bought a 4K monitor, which is equivalent to four 1080p screens. I actually got a curved 55" 4K TV, since I normally angled my smaller monitors into an arc.
My first test was to get some information from each of nearly two dozen schematic drawings. At my desk, I had been continuously panning, scrolling and zooming to find the information needed. On the big TV, with the schematic filling the screen, I could easily read all if it directly, with no movements or adjustments required. Win!
That evening I went through a beginner tutorial for Fusion 360. Having a massive screen gave me tons of work area in the center for the model, while having all the menus and lists I needed conveniently displayed around the edges. By the end of that one video I understood the basic Fusion 360 workflow, something that had eluded me with all prior attempts, including other programs such as TinkerCAD, SketchUp, 3D Builder and more.
I suppose I may look weird sitting 4 feet away from a 55" TV, but it is one heck of a productivity device.
Wednesday, March 25, 2020

Sunday, September 15, 2019
PCA and Me.
I recently watched Computerphile's video sequence on Data Analysis, which prompted me to share my own experience with PCA:
Early in my engineering career I worked in a field where we had to measure certain quantities with extraordinarily high accuracy. When we found ourselves an a situation where we needed to buy an instrument that cost well over $1,000,000 (the instrument was so rare it was impossible to rent one), management suggested we start a side project to build our own instrument that would at least meet our immediate needs, and if we did it well, we could go on to sell it to compete against that million dollar instrument. Our physicists and other scientists immediately dreamed up a "novel physics" sensor they predicted would be both more sensitive and less expensive. They then built a "Proof of Concept" device in the lab, and it's performance looked very promising.
My job was first to turn that table-covering lab experiment into something useful to our engineers, then determine if it could be manufactured and sold. The lab device functioned horribly when removed from the lab. The lab was temperature controlled, vibration isolated (optical table), light controlled (dark), sound controlled (anechoic wall coverings), EM controlled (Faraday cage, shields), and so on.
What they did in the lab was expose the sensor to known levels of the stimulus we wanted to detect and measure, then develop algorithms to map the raw sensor signal to the applied stimulus, then do several test runs to gather enough data to determine accuracy, precision and repeatability. My job was to determine what would be needed to build a device that worked outside the lab, with enough quality and performance to meet our needs.
My first test was simply to repeat the lab test on my engineering workbench. As previously mentioned, the results were horrible: A quick plot instantly proved the value from the device appeared to be utterly unrelated to the applied stimulus, even after the raw output was post-processed with the algorithms used in the lab. In fact, the raw output looked more like random noise.
This was no surprise! Few sensors, if any, ever measure only one thing. For example, the voltage sensor in a common hand-held multimeter is a circuit that is affected by many other environmental stimuli other than the voltage present on the probes, such as temperature, electrical noise, pressure, humidity, and so on. Yet portable multimeters with 6-digit accuracy can be had for only a few hundred dollars: Clearly, these other stimuli can be engineered out of the final product to the extent that 6-digit precision is achieved.
The lab environment is what's called a "single variable system": Everything but the desired stimulus was held constant. My workbench was far "noisier". The next step was to intentionally vary as many environmental factors as possible, and see how the sensor responded. Ideally, only one environmental factor would be varied at a time, but that's simply not practical outside a far larger lab. So you go the opposite way, taking data with as much stable as possible, then vary the factors one at a time or in combination, whichever was most practical (fast, easy, cheap), the primarily requirement being to measure everything that could be measured in parallel with the desired applied stimulus.
The "pièce de résistance" of this effort was a long data set taken over days while simultaneously (and very carefully) varying as many environmental factors as possible, which in this case took place inside a temperature+humidity chamber that contained a miniature shake table (basically, a speaker with a plate on top instead of a cone), to which I added accelerometers to measure motion, and whatever other instruments I could find that measured anything and everything else to as high a precision as possible.
This setup made Frankenstein's Monster look pretty, and Rube Goldberg's devices look simple, elegant and sensible. Getting all this data correctly gathered and recorded was its own nightmare, the most critical item being correctly tagging each and every measurement with the precise time at which it was taken. (Timing deserves it's own separate post.)
Each data point contains the time at which the data was taken, the value for each environmental parameter being measured (including the desired stimulus), and finally the raw value output by the sensor itself. The correct term for a data point created from multiple measurements is a "sample", done specifically to remind us that we aren't seeing "actual physics", but only what our instruments are revealing to us.
Note: What I've described above is "time-series" data, which enables many additional analytical techniques to be applied, because time connects adjacent data points in ways few other parameters permit. Most importantly, time-series data can be analyzed in both the linear domain (much as is done in the video series) and also in the frequency (or complex) domain. The most well-known tool connecting these domains is the FFT (Fast Fourier Transform), though there are others.
At the end, what you have is a truckload of data. Several truckloads. Millions of data points, each with up to a dozen attributes. At that point, the data collection stops and the analysis starts. The best place to start is with the largest, messiest data set. First you condition the data as described in the videos. Then the best tool to apply is PCA.
I followed an iterative process:
1. Run PCA.
2. Determine which environmental factor best correlates to PC1.
3. Remove that factor from the sensor data.
4. Repeat from Step 1 until PC1 no longer correlates with any of the environmental factors.
Step 3 may sound simple, but it is very complex to do correctly. Simply subtracting a normalized value from the raw sensor data is seldom useful, as the effect is seldom purely additive or purely linear. We must determine if there are known/common transformations that will permit the environmental factor to account for most of PC1. Temperature, for example, often has an exponential factor in its effect.
"But wait!" I hear you say. "Isn't PCA strictly a linear process? How can you use it to derive an exponential correction?" The simple answer is you can't, not directly. So you cheat. Given enough data, PCA can be applied to shorter chunks, permitting piece-wise linear corrections to be determined, from which the governing non-linear (exponential or polynomial) correction may be derived. That's why multiple millions of samples are taken.
Not surprisingly, the first PC1 correlated with temperature, validating the truism "All sensors are thermometers". Which is why every measurement instrument applies at least one, and often multiple, temperature corrections.
Next was vibration, with the matching truism "All sensors are microphones", which explains the shock mounts used within many instruments. Just rapping your knuckle on the case of a $20K oscilloscope will often be enough to cause it to trigger due to piezo-electric effects present in the MLC capacitors used in the sensitive input amplifiers. (See the EEVBlog videos on this.)
The above process has one huge, massive, terrible downside: It accumulates/amplifies all noise present in the data. In my case, Step 4 was reached even before the stimulus of interest was matched by correlation with PC1! The noise was dominant and correlated with nothing.
Which means we toss out all the data and start over, this time directly removing the environmental factors having the highest correlations. There are two ways to remove the effect of an environmental factor from a sensor: Either hold it constant or remove a signal to cancel its effect.
For the example of temperature, the sensor could be actively heated/cooled to keep it at a known temperature, something commonly done for precision time references such as crystals and atomic clocks (called putting them in an "oven"). This is called "effect prevention", and it is relatively expensive to implement within an instrument, to be avoided unless absolutely necessary. There are some sensor materials that work best only at a single temperature, so an oven is the only choice if that sensor is to be used.
The other alternative is to reduce the effect as best we can, then generate a signal that matches the remaining effect and remove it from the sensor value. This is called "effect compensation", and is relatively cheap to implement, though it is always preferred to find sensor materials that don't need compensation. For temperature, it can be as simple as wrapping the sensor in fiberglass with a temperature sensor inside. The sensor could be an RTD, diode or thermocouple, which ever best matches the behavior observed in the raw sensor signal. Then that signal is subtracted or divided from the sensor signal.
Then it's time to repeat the data gathering run in the exact same way as before, and repeat the above analysis. We repeat the process of correlating and removing effects and doing the data gathering until as many correlations as practically possible have been removed. It should be no surprise that temperature had to be "removed" multiple times, generally by adding higher-order terms to the correction.
We soon reached the point where we could reliably extract a useful measurement for the desired stimulus from the single system sitting on my workbench. It performed significantly worse than the million dollar instrument, but it met our immediate needs. That device was more properly called an "escaped lab rat", in that while it definitely worked outside the lab, it wasn't anything close to being a commercial instrument.
A commercial instrument has two key features: It can be calibrated, and once calibrated it provides useful results for an extended period of time. In the example of the million dollar instrument, it had to be calibrated every time it was turned on, which meant it could never be turned off! (This is not uncommon for ultra-high-end instruments.) So part of the purchase price was an uninterruptible power supply.
Fortunately, our "escaped lab rat" could be turned on and off as needed, requiring only a 5-10 minute stabilization period before producing usable measurements. Which gave us a very good reason to keep working, and management agreed, giving us a generous budget. The larger budget was needed because this effort would be far greater than a single engineer at a workbench.
The project started just as did my prior efforts, with taking lots of data and doing lots of analysis. Only this time the goal was to optimize everything to find the best solution for each correction, which meant testing multiple alternatives, and sometimes combining them. This is when R&D (Research and Development) becomes "Product Development". Being primarily an R&D engineer, I stayed with the project long enough to share my work, then moved on to other projects.
That instrument did make it to market, then completely took it over. I'd love to say what that instrument was, or who made it, or what it sensed, but none of it was patented: The technologies used were considered so bleeding-edge that filing patents would expose them to the world, encouraging others to engineer around the patents rather than create something from first-principles as we did. That makes what we did a Trade Secret, something I can't share until it otherwise becomes common knowledge (and is the reason why some NDAs have no expiration date).
The process shared above is common practice in sensor R&D, and is the best reason to become multidisciplinary: While my university degree is in Computer Engineering (100% CS + 30% EE), I was an electronics lab technician before and during college, and also did well in physics, math and statistics. I'm now a Systems Engineer, where I get to work at the highest product and technology levels, yet I'm still able to get some lab time in when a knotty problem arises.
Of all the skills I've accumulated, the most useful has been knowing when and how to use PCA, and knowing what to do with the results. Statistics and data analysis methods allow us to tame the chaos of the real world, and to make sense of it.
Early in my engineering career I worked in a field where we had to measure certain quantities with extraordinarily high accuracy. When we found ourselves an a situation where we needed to buy an instrument that cost well over $1,000,000 (the instrument was so rare it was impossible to rent one), management suggested we start a side project to build our own instrument that would at least meet our immediate needs, and if we did it well, we could go on to sell it to compete against that million dollar instrument. Our physicists and other scientists immediately dreamed up a "novel physics" sensor they predicted would be both more sensitive and less expensive. They then built a "Proof of Concept" device in the lab, and it's performance looked very promising.
My job was first to turn that table-covering lab experiment into something useful to our engineers, then determine if it could be manufactured and sold. The lab device functioned horribly when removed from the lab. The lab was temperature controlled, vibration isolated (optical table), light controlled (dark), sound controlled (anechoic wall coverings), EM controlled (Faraday cage, shields), and so on.
What they did in the lab was expose the sensor to known levels of the stimulus we wanted to detect and measure, then develop algorithms to map the raw sensor signal to the applied stimulus, then do several test runs to gather enough data to determine accuracy, precision and repeatability. My job was to determine what would be needed to build a device that worked outside the lab, with enough quality and performance to meet our needs.
My first test was simply to repeat the lab test on my engineering workbench. As previously mentioned, the results were horrible: A quick plot instantly proved the value from the device appeared to be utterly unrelated to the applied stimulus, even after the raw output was post-processed with the algorithms used in the lab. In fact, the raw output looked more like random noise.
This was no surprise! Few sensors, if any, ever measure only one thing. For example, the voltage sensor in a common hand-held multimeter is a circuit that is affected by many other environmental stimuli other than the voltage present on the probes, such as temperature, electrical noise, pressure, humidity, and so on. Yet portable multimeters with 6-digit accuracy can be had for only a few hundred dollars: Clearly, these other stimuli can be engineered out of the final product to the extent that 6-digit precision is achieved.
The lab environment is what's called a "single variable system": Everything but the desired stimulus was held constant. My workbench was far "noisier". The next step was to intentionally vary as many environmental factors as possible, and see how the sensor responded. Ideally, only one environmental factor would be varied at a time, but that's simply not practical outside a far larger lab. So you go the opposite way, taking data with as much stable as possible, then vary the factors one at a time or in combination, whichever was most practical (fast, easy, cheap), the primarily requirement being to measure everything that could be measured in parallel with the desired applied stimulus.
The "pièce de résistance" of this effort was a long data set taken over days while simultaneously (and very carefully) varying as many environmental factors as possible, which in this case took place inside a temperature+humidity chamber that contained a miniature shake table (basically, a speaker with a plate on top instead of a cone), to which I added accelerometers to measure motion, and whatever other instruments I could find that measured anything and everything else to as high a precision as possible.
This setup made Frankenstein's Monster look pretty, and Rube Goldberg's devices look simple, elegant and sensible. Getting all this data correctly gathered and recorded was its own nightmare, the most critical item being correctly tagging each and every measurement with the precise time at which it was taken. (Timing deserves it's own separate post.)
Each data point contains the time at which the data was taken, the value for each environmental parameter being measured (including the desired stimulus), and finally the raw value output by the sensor itself. The correct term for a data point created from multiple measurements is a "sample", done specifically to remind us that we aren't seeing "actual physics", but only what our instruments are revealing to us.
Note: What I've described above is "time-series" data, which enables many additional analytical techniques to be applied, because time connects adjacent data points in ways few other parameters permit. Most importantly, time-series data can be analyzed in both the linear domain (much as is done in the video series) and also in the frequency (or complex) domain. The most well-known tool connecting these domains is the FFT (Fast Fourier Transform), though there are others.
At the end, what you have is a truckload of data. Several truckloads. Millions of data points, each with up to a dozen attributes. At that point, the data collection stops and the analysis starts. The best place to start is with the largest, messiest data set. First you condition the data as described in the videos. Then the best tool to apply is PCA.
I followed an iterative process:
1. Run PCA.
2. Determine which environmental factor best correlates to PC1.
3. Remove that factor from the sensor data.
4. Repeat from Step 1 until PC1 no longer correlates with any of the environmental factors.
Step 3 may sound simple, but it is very complex to do correctly. Simply subtracting a normalized value from the raw sensor data is seldom useful, as the effect is seldom purely additive or purely linear. We must determine if there are known/common transformations that will permit the environmental factor to account for most of PC1. Temperature, for example, often has an exponential factor in its effect.
"But wait!" I hear you say. "Isn't PCA strictly a linear process? How can you use it to derive an exponential correction?" The simple answer is you can't, not directly. So you cheat. Given enough data, PCA can be applied to shorter chunks, permitting piece-wise linear corrections to be determined, from which the governing non-linear (exponential or polynomial) correction may be derived. That's why multiple millions of samples are taken.
Not surprisingly, the first PC1 correlated with temperature, validating the truism "All sensors are thermometers". Which is why every measurement instrument applies at least one, and often multiple, temperature corrections.
Next was vibration, with the matching truism "All sensors are microphones", which explains the shock mounts used within many instruments. Just rapping your knuckle on the case of a $20K oscilloscope will often be enough to cause it to trigger due to piezo-electric effects present in the MLC capacitors used in the sensitive input amplifiers. (See the EEVBlog videos on this.)
The above process has one huge, massive, terrible downside: It accumulates/amplifies all noise present in the data. In my case, Step 4 was reached even before the stimulus of interest was matched by correlation with PC1! The noise was dominant and correlated with nothing.
Which means we toss out all the data and start over, this time directly removing the environmental factors having the highest correlations. There are two ways to remove the effect of an environmental factor from a sensor: Either hold it constant or remove a signal to cancel its effect.
For the example of temperature, the sensor could be actively heated/cooled to keep it at a known temperature, something commonly done for precision time references such as crystals and atomic clocks (called putting them in an "oven"). This is called "effect prevention", and it is relatively expensive to implement within an instrument, to be avoided unless absolutely necessary. There are some sensor materials that work best only at a single temperature, so an oven is the only choice if that sensor is to be used.
The other alternative is to reduce the effect as best we can, then generate a signal that matches the remaining effect and remove it from the sensor value. This is called "effect compensation", and is relatively cheap to implement, though it is always preferred to find sensor materials that don't need compensation. For temperature, it can be as simple as wrapping the sensor in fiberglass with a temperature sensor inside. The sensor could be an RTD, diode or thermocouple, which ever best matches the behavior observed in the raw sensor signal. Then that signal is subtracted or divided from the sensor signal.
Then it's time to repeat the data gathering run in the exact same way as before, and repeat the above analysis. We repeat the process of correlating and removing effects and doing the data gathering until as many correlations as practically possible have been removed. It should be no surprise that temperature had to be "removed" multiple times, generally by adding higher-order terms to the correction.
We soon reached the point where we could reliably extract a useful measurement for the desired stimulus from the single system sitting on my workbench. It performed significantly worse than the million dollar instrument, but it met our immediate needs. That device was more properly called an "escaped lab rat", in that while it definitely worked outside the lab, it wasn't anything close to being a commercial instrument.
A commercial instrument has two key features: It can be calibrated, and once calibrated it provides useful results for an extended period of time. In the example of the million dollar instrument, it had to be calibrated every time it was turned on, which meant it could never be turned off! (This is not uncommon for ultra-high-end instruments.) So part of the purchase price was an uninterruptible power supply.
Fortunately, our "escaped lab rat" could be turned on and off as needed, requiring only a 5-10 minute stabilization period before producing usable measurements. Which gave us a very good reason to keep working, and management agreed, giving us a generous budget. The larger budget was needed because this effort would be far greater than a single engineer at a workbench.
The project started just as did my prior efforts, with taking lots of data and doing lots of analysis. Only this time the goal was to optimize everything to find the best solution for each correction, which meant testing multiple alternatives, and sometimes combining them. This is when R&D (Research and Development) becomes "Product Development". Being primarily an R&D engineer, I stayed with the project long enough to share my work, then moved on to other projects.
That instrument did make it to market, then completely took it over. I'd love to say what that instrument was, or who made it, or what it sensed, but none of it was patented: The technologies used were considered so bleeding-edge that filing patents would expose them to the world, encouraging others to engineer around the patents rather than create something from first-principles as we did. That makes what we did a Trade Secret, something I can't share until it otherwise becomes common knowledge (and is the reason why some NDAs have no expiration date).
The process shared above is common practice in sensor R&D, and is the best reason to become multidisciplinary: While my university degree is in Computer Engineering (100% CS + 30% EE), I was an electronics lab technician before and during college, and also did well in physics, math and statistics. I'm now a Systems Engineer, where I get to work at the highest product and technology levels, yet I'm still able to get some lab time in when a knotty problem arises.
Of all the skills I've accumulated, the most useful has been knowing when and how to use PCA, and knowing what to do with the results. Statistics and data analysis methods allow us to tame the chaos of the real world, and to make sense of it.
Thursday, May 9, 2019
Moving Bash scripts to Python...
So, I have a bunch of hardware test scripts that became a bit more than Bash could comfortably handle (e.g., I needed n-dimensional arrays, when Bash stops at 1), so I decided to start moving things to Python, truly my favorite "Git 'er done" language on the planet.
But I quickly hit a block. Many of my scripts need to check the hardware state every second, mainly to check the "I'm On Fire" bit. To do this, I use Bash's read -rs -t1 -n1 command, which waits up to one second to grab a character into the $REPLY variable.
Remarkably, Python has nothing like this simple function! WTF? Not even in a standard package?
I went on a quest to find this missing link, even going to the Hive Mind at StackExchange for advice. And I wound up answering my own question. It turns out I had entered Python's "Dead Zone", asking for things that looked easy, yet were too hard to include in either the language or a standard package included with the language.
If you didn't click the link above, please do so now. The "correct" answer (IMHO) is to simply let Bash do what Bash does best.
I suppose I really should generate a PEP for this, but now that I have my answer, I'm just too lazy to change it: It works!
And doesn't that really make it abide with the Zen of Python?
But I quickly hit a block. Many of my scripts need to check the hardware state every second, mainly to check the "I'm On Fire" bit. To do this, I use Bash's read -rs -t1 -n1 command, which waits up to one second to grab a character into the $REPLY variable.
Remarkably, Python has nothing like this simple function! WTF? Not even in a standard package?
I went on a quest to find this missing link, even going to the Hive Mind at StackExchange for advice. And I wound up answering my own question. It turns out I had entered Python's "Dead Zone", asking for things that looked easy, yet were too hard to include in either the language or a standard package included with the language.
If you didn't click the link above, please do so now. The "correct" answer (IMHO) is to simply let Bash do what Bash does best.
I suppose I really should generate a PEP for this, but now that I have my answer, I'm just too lazy to change it: It works!
And doesn't that really make it abide with the Zen of Python?
Wednesday, October 31, 2018
LED Headlight Bulbs
At 6 years and 95K miles on my car, the first bulb (of any type) finally burned out: The driver's side low-beam. My car lacks DRLs, so I drive with my low-beams on all the time, meaning the bulbs had been operating for every one of those 95K miles driven over those 6 years.
Not bad for a tungsten-halogen bulb, right?
Leading up to this I had been thinking I was losing my night vision, as the headlights seemed dimmer and more orange. Turns out a large part of that was the bulb actually dimming and turning more orange: While the halogen gas within the bulb massively reduces the rate at which tungsten vaporizes off the hot filament, it doesn't zero it. And what does come off makes its way to the cooler glass walls, slowly making them darker and acting as a filter that preferentially blocks shorter light frequencies, leading to both the dimming and the orange-ing.
I jumped onto Amazon and ordered a pair of replacement halogen bulbs, knowing they'd be good to use. But a minute after pressing "Buy" I decided to check out LED replacements, just for comparison.
What I found surprised me, though it shouldn't have: LED bulbs putting out the same light as 55 watt halogen bulbs use 1/10 the power! At the other extreme, I could get 10x the light for the same power!
I canceled my order to give me time to think about this. Would LED bulbs be a better way to go?
The first decision concerned what power level to get. While the halogen bulbs used 55 watts, none of the LED bulbs got close to that, maxing out at about 40 watts for ones that could illuminate the moon. And some very powerful, popular, and highly-rated bulbs were available for barely over $20 per pair.
But in the pictures they all looked way bigger and bulkier than I expected, making me wonder if I'd have enough room to install them.
It turns out they were big because all had fans in them, to keep the LEDs at a safe operating temperature. I immediately knew there was no way such tiny high-speed fans would last the next 95K miles. Some of the bulbs even advertised having fans that were "easy-to-replace". Not really a good sign.
So I searched for "fanless LED headlight bulbs", and the results were more to my liking. I chose the highest-rated of the mid-priced ones, which cost $31 for the pair, compared to the $11 for the halogen replacement bulbs. The LED bulbs consumed only 8 watts each, but put out nearly 3x the light of the original halogen bulbs. So, 3x the light for 3x the price (and 1/7 the power) sounded like a good value to me.
I placed the order, they arrived the next day, and I installed them that evening. The difference was, well, like night and day. The higher color temperature reveals much more color at night, and the reflective paint on the road and signs was visible at least 4x further away.
I immediately felt safer. And my eyes worked just fine.
If you're still driving on tungsten-halogen low-beams, please stop! The upgrade to LED bulbs is well worth it from a safety standpoint alone.
Not bad for a tungsten-halogen bulb, right?
Leading up to this I had been thinking I was losing my night vision, as the headlights seemed dimmer and more orange. Turns out a large part of that was the bulb actually dimming and turning more orange: While the halogen gas within the bulb massively reduces the rate at which tungsten vaporizes off the hot filament, it doesn't zero it. And what does come off makes its way to the cooler glass walls, slowly making them darker and acting as a filter that preferentially blocks shorter light frequencies, leading to both the dimming and the orange-ing.
I jumped onto Amazon and ordered a pair of replacement halogen bulbs, knowing they'd be good to use. But a minute after pressing "Buy" I decided to check out LED replacements, just for comparison.
What I found surprised me, though it shouldn't have: LED bulbs putting out the same light as 55 watt halogen bulbs use 1/10 the power! At the other extreme, I could get 10x the light for the same power!
I canceled my order to give me time to think about this. Would LED bulbs be a better way to go?
The first decision concerned what power level to get. While the halogen bulbs used 55 watts, none of the LED bulbs got close to that, maxing out at about 40 watts for ones that could illuminate the moon. And some very powerful, popular, and highly-rated bulbs were available for barely over $20 per pair.
But in the pictures they all looked way bigger and bulkier than I expected, making me wonder if I'd have enough room to install them.
It turns out they were big because all had fans in them, to keep the LEDs at a safe operating temperature. I immediately knew there was no way such tiny high-speed fans would last the next 95K miles. Some of the bulbs even advertised having fans that were "easy-to-replace". Not really a good sign.
So I searched for "fanless LED headlight bulbs", and the results were more to my liking. I chose the highest-rated of the mid-priced ones, which cost $31 for the pair, compared to the $11 for the halogen replacement bulbs. The LED bulbs consumed only 8 watts each, but put out nearly 3x the light of the original halogen bulbs. So, 3x the light for 3x the price (and 1/7 the power) sounded like a good value to me.
I placed the order, they arrived the next day, and I installed them that evening. The difference was, well, like night and day. The higher color temperature reveals much more color at night, and the reflective paint on the road and signs was visible at least 4x further away.
I immediately felt safer. And my eyes worked just fine.
If you're still driving on tungsten-halogen low-beams, please stop! The upgrade to LED bulbs is well worth it from a safety standpoint alone.
Saturday, September 15, 2018
Yes, my new curved 65" 4K TV is also my HTPC monitor!
My old 42" TV/monitor was fading. Literally. It had a cold-cathode fluorescent backlight that was showing its age. Even at full brightness, it was becoming an issue in a day-lit room.
So I measured the place it occupied, and decided to get the biggest TV that would fit, which turned out to be 65" (1.65m) diagonal.
I also wanted to get a curved screen, because I sit relatively close to my TV/monitor (2-3 meters), and the angle to the corners of a flat screen had a clearly different appearance (a combination of dimming and color shift), so I wanted the corners to be aimed more toward me.
That was over two years ago, and that TV had only become worse since. But I'm a cheapbas, uh, person, and I didn't want to pay the prices for even the cheapest curved 65" TVs available. I also didn't want or need a "smart" TV, but that was a basic feature of all curved TVs.
So I waited. And waited. About a year ago it became clear that the curved screen "fad" had peaked, and fewer models were being offered. Then the generic brands started to release curved TVs, but their initial efforts were truly terrible.
Earlier this year Sceptre introduced their second-generation curved screen (the C650 series), and it seemed to be the best of all the generic brands. I give it a few months for reviews from reputable review sites to be posted, but none ever were! It was as if this TV was too cheap to be worth their time.
The largest distributor was Walmart, which only sells things that make them money, meaning few returns for any reason. So I started reading user reviews, and was impressed by how few flaws were revealed.
I continued to wait, hoping for a sale of some kind. The price gradually drifted lower, but only a little. When it didn't go on sale for Labor Day, I finally decided to pull the trigger, and ordered the Sceptre C658 for US$500. I bought it on Amazon, but from Walmart, since Amazon also offered an awesome 4-year warranty extension for $25: The cheaper something is, the more important it becomes to get an extended warranty.
I ordered not only the TV, but also an Amazon Fire TV Cube, which was on sale for $79. The main reason for that was I had no source of 4K content: My HTPC is a powerful but rather old i5 with internal graphics and a video resolution that tops out at 1080p60. And I'm too cheap to upgrade it with a new video card, when I really should upgrade the whole machine.
I got a text Friday that FedEx had made the delivery, so I headed home during lunch to get it indoors and off the driveway. It was more bulky than heavy. I immediately unboxed it and plugged it in to the Fire TV Cube that had arrived the day before, and was greeted with wonderful 4K video, with a very bright screen and zero bad pixels.
The bloody thing is huge in size, but doesn't weigh all that much more than the 42" TV it replaced.
I spent Friday evening getting everything connected and tested, with no problems whatsoever.
Best of all, it finally made all my other equipment play nice together: My old TV had an early version of CEC, and didn't really play well with my other equipment. Now my Sony AV receiver, LG DVD player and Dell HTPC all happily play with this Sceptre TV.
What's weird is I can use any remote to control everything. The Fire TV Cube is the hardest to use, because I still don't have the right Alexa skills configured. But the Sony AV remote can control the TV, and the TV remote can control both the Sony and the LG. I haven't yet tried using the LG remote because I can't find it.
As for the video quality, I'm not much of a judge, but it looks beyond awesome to me. The TV does very good upsizing of 1080p to 4k, with only a few tiny motion artifacts occasionally being visible. Of course, those artifacts could have been there all along, but my old TV was unable to let me see them.
I've been watching some 4K content on Amazon Prime, and I have to say, bigger is better. The 4K resolution itself isn't a big deal for me where movies are concerned, only looking slightly better than 1080p to me. But sitting so close to that huge curved screen makes movies more immersive, and much more watchable and enjoyable.
Surfing the web is also much easier, as the bigger and brighter screen is much easier on the eyes. I hadn't realized just how small and dim my old TV really was.
This is SO much better, and a very worthy investment that I hope will last longer than the extended warranty!
So I measured the place it occupied, and decided to get the biggest TV that would fit, which turned out to be 65" (1.65m) diagonal.
I also wanted to get a curved screen, because I sit relatively close to my TV/monitor (2-3 meters), and the angle to the corners of a flat screen had a clearly different appearance (a combination of dimming and color shift), so I wanted the corners to be aimed more toward me.
That was over two years ago, and that TV had only become worse since. But I'm a cheap
So I waited. And waited. About a year ago it became clear that the curved screen "fad" had peaked, and fewer models were being offered. Then the generic brands started to release curved TVs, but their initial efforts were truly terrible.
Earlier this year Sceptre introduced their second-generation curved screen (the C650 series), and it seemed to be the best of all the generic brands. I give it a few months for reviews from reputable review sites to be posted, but none ever were! It was as if this TV was too cheap to be worth their time.
The largest distributor was Walmart, which only sells things that make them money, meaning few returns for any reason. So I started reading user reviews, and was impressed by how few flaws were revealed.
I continued to wait, hoping for a sale of some kind. The price gradually drifted lower, but only a little. When it didn't go on sale for Labor Day, I finally decided to pull the trigger, and ordered the Sceptre C658 for US$500. I bought it on Amazon, but from Walmart, since Amazon also offered an awesome 4-year warranty extension for $25: The cheaper something is, the more important it becomes to get an extended warranty.
I ordered not only the TV, but also an Amazon Fire TV Cube, which was on sale for $79. The main reason for that was I had no source of 4K content: My HTPC is a powerful but rather old i5 with internal graphics and a video resolution that tops out at 1080p60. And I'm too cheap to upgrade it with a new video card, when I really should upgrade the whole machine.
I got a text Friday that FedEx had made the delivery, so I headed home during lunch to get it indoors and off the driveway. It was more bulky than heavy. I immediately unboxed it and plugged it in to the Fire TV Cube that had arrived the day before, and was greeted with wonderful 4K video, with a very bright screen and zero bad pixels.
The bloody thing is huge in size, but doesn't weigh all that much more than the 42" TV it replaced.
I spent Friday evening getting everything connected and tested, with no problems whatsoever.
Best of all, it finally made all my other equipment play nice together: My old TV had an early version of CEC, and didn't really play well with my other equipment. Now my Sony AV receiver, LG DVD player and Dell HTPC all happily play with this Sceptre TV.
What's weird is I can use any remote to control everything. The Fire TV Cube is the hardest to use, because I still don't have the right Alexa skills configured. But the Sony AV remote can control the TV, and the TV remote can control both the Sony and the LG. I haven't yet tried using the LG remote because I can't find it.
As for the video quality, I'm not much of a judge, but it looks beyond awesome to me. The TV does very good upsizing of 1080p to 4k, with only a few tiny motion artifacts occasionally being visible. Of course, those artifacts could have been there all along, but my old TV was unable to let me see them.
I've been watching some 4K content on Amazon Prime, and I have to say, bigger is better. The 4K resolution itself isn't a big deal for me where movies are concerned, only looking slightly better than 1080p to me. But sitting so close to that huge curved screen makes movies more immersive, and much more watchable and enjoyable.
Surfing the web is also much easier, as the bigger and brighter screen is much easier on the eyes. I hadn't realized just how small and dim my old TV really was.
This is SO much better, and a very worthy investment that I hope will last longer than the extended warranty!
Saturday, May 26, 2018
Monoprice Mini Delta 3D Printer
There I was, stranded between two sources of 3D printing pain.
First, my only 3D printer was the horribly slow 101Hero, which insists on revealing more of its limitations as my skills have grown.
Second, nearly a year ago I backed the BuildOne 3D printer Kickstarter campaign. Production and delivery are 6 months late at this point (due to bad part vendors that in turn caused a complete printer redesign), though I expect to have it before the end of this year.
But that's way too long to persist with the 101Hero, which was only meant to be a disposable "training wheels" printer.
Last week I snapped. I desperately needed to print faster than the 10 mm/sec (yes, that's right) best rate I was seeing on a printer that had lousy positioning accuracy. It was ruining over half of my prints, and that's accounting for the great strides I've made in getting past many of the 101Hero's other limitations.
I really wanted my next printer to be a Creality CR-10, but I didn't want to order one just yet. I really wanted another small printer, just one that would print faster and better.
On paper, the $159 Monoprice Mini Delta (MPMD) was exactly the machine I wanted: A small fast delta that included a heated bed, a color LCD control panel and even WiFi support. It arrived 3 days after I placed my order, and I had started the test print provided on the uSD card less than 30 minutes after first touching the box. There was literally no setup to do other than getting it out of the box, loading the filament, inserting the provided uSD card, and plugging it in.
The test print, a waving cat (that didn't wave), came out perfect!
My next task was to configure Cura for the MPMD. This proved to be unexpectedly cumbersome, since no Cura configuration was provided that would work with the latest Cura (3.3.1). Cura version 15.04.6 is included on the uSD card, but it lacks features I've come to rely upon. The Cura configuration was soon complete, thanks to the abundant community help online, which is fortunate since Monoprice support seems not to exist (or, more likely, is overwhelmed).
I loaded up the STL for the single-layer delta calibration print I've been using with the 101Hero, scaled it to fit the MPMD, saved it to the uSD card, then started the print.
I watched the system first warm up the bed then the hot-end (done in sequence to limit power supply loading), Next I saw the system do it's auto-leveling process (double taps near each tower). Then I watched the effector slam into the print bed and start digging gouges into the bed's plastic surface. It took me a moment to figure out how to abort the print, during which time more ruts were dug.
Were I thinking a little faster, I would have simply cut the power instead. Which would have required pulling the cord, since the MPMD has no power switch. Something that even the crippled 101Hero has!
A tiny bit more research revealed the MPMD "auto-leveling" feature is completely broken. There is a work-around, but it requires repositioning the end-stops to be within a fraction of a millimeter of each other. Which I did, over and over again, for nearly an hour, with much cursing.
After which I had to update the Cura printer start gcode to use a slightly different auto-level command that was far more reliable than the one recommended by Monoprice.
And that was the end of the major drama. My MPMD has been printing nearly non-stop since then, with great results.
But not perfect! Most of the print defects are due to the MPMD's floating print bed: It literally rests on top of three spring switches that are used for auto-leveling, which, despite having alignment pegs, means the bed has nearly 1 mm of sideways slop, which is enough to create a noticeable layer shift.
The MPMD has other minor imperfections. The first is the noise. Even when not running, the fan in the bottom is surprisingly loud. I modified a 60 mm fan mount design that is in the queue for printing. The noise gets far worse when printing, mainly due to the bushings on the steel rods. My plan is to clean them then lubricate with lithium grease.
The final significant noise source is conducted sound from the steppers. I haven't yet selected a remedy for that, mainly because there are so many to choose from! There are sound-isolating mounts, stepper smoothers, and switching to improved driver chips, such as the Trinamic drivers. There are also things the slicer can do to reduce noise, starting with the acceleration, but also by limiting travel speed. I'll try those first.
As I learn more about 3D printing, I want to twist more of the knobs. On a Marlin system I can permanently tweak the configurations in the source code, and can tweak settings stored in EEPROM, as well as tweak settings during each individual print. The MPMD doesn't use Marlin, though the gcode does appear to be very compatible.
The display on a Marlin system can be used to tweak many settings while the printer is printing, making it much faster and easier to get things dialed-in. The MPMD display does permit a few things to be tweaked, but almost none compared to Marlin. Still, the MPMD display does all the basics quite well, and does so while looking fantastic. It's really great to have a printer display I can read from across the room!
One odd thing is the location of the spool holder onthe back of the printer: The filament has to take a needlessly tortuous path to the extruder I printed a quick bracket that lets my use a paint roller as a spool holder, placing the spool above and in line with the extruder, as well as closer to the printer's center of gravity. A paint roller really is an awesome spool holder.
That loud fan in the base also causes another problem: It blows air directly on the bed heater, meaning it takes longer for the bed to heat up. The hole under the bed heater is easily filled by printing a cup designed for the job, which I found on Thingiverse. The performance difference was immediately noticeable.
Once you adjust the limit switches and get auto-leveling to behave, the MPMD is truly a fantastic value, despite the other minor annoyances (all of which have solutions, or at least work-arounds).
Then again, I'm coming from a 101Hero: ANYTHING else would be a huge step up for me!
First, my only 3D printer was the horribly slow 101Hero, which insists on revealing more of its limitations as my skills have grown.
Second, nearly a year ago I backed the BuildOne 3D printer Kickstarter campaign. Production and delivery are 6 months late at this point (due to bad part vendors that in turn caused a complete printer redesign), though I expect to have it before the end of this year.
But that's way too long to persist with the 101Hero, which was only meant to be a disposable "training wheels" printer.
Last week I snapped. I desperately needed to print faster than the 10 mm/sec (yes, that's right) best rate I was seeing on a printer that had lousy positioning accuracy. It was ruining over half of my prints, and that's accounting for the great strides I've made in getting past many of the 101Hero's other limitations.
I really wanted my next printer to be a Creality CR-10, but I didn't want to order one just yet. I really wanted another small printer, just one that would print faster and better.
On paper, the $159 Monoprice Mini Delta (MPMD) was exactly the machine I wanted: A small fast delta that included a heated bed, a color LCD control panel and even WiFi support. It arrived 3 days after I placed my order, and I had started the test print provided on the uSD card less than 30 minutes after first touching the box. There was literally no setup to do other than getting it out of the box, loading the filament, inserting the provided uSD card, and plugging it in.
The test print, a waving cat (that didn't wave), came out perfect!
My next task was to configure Cura for the MPMD. This proved to be unexpectedly cumbersome, since no Cura configuration was provided that would work with the latest Cura (3.3.1). Cura version 15.04.6 is included on the uSD card, but it lacks features I've come to rely upon. The Cura configuration was soon complete, thanks to the abundant community help online, which is fortunate since Monoprice support seems not to exist (or, more likely, is overwhelmed).
I loaded up the STL for the single-layer delta calibration print I've been using with the 101Hero, scaled it to fit the MPMD, saved it to the uSD card, then started the print.
I watched the system first warm up the bed then the hot-end (done in sequence to limit power supply loading), Next I saw the system do it's auto-leveling process (double taps near each tower). Then I watched the effector slam into the print bed and start digging gouges into the bed's plastic surface. It took me a moment to figure out how to abort the print, during which time more ruts were dug.
Were I thinking a little faster, I would have simply cut the power instead. Which would have required pulling the cord, since the MPMD has no power switch. Something that even the crippled 101Hero has!
A tiny bit more research revealed the MPMD "auto-leveling" feature is completely broken. There is a work-around, but it requires repositioning the end-stops to be within a fraction of a millimeter of each other. Which I did, over and over again, for nearly an hour, with much cursing.
After which I had to update the Cura printer start gcode to use a slightly different auto-level command that was far more reliable than the one recommended by Monoprice.
And that was the end of the major drama. My MPMD has been printing nearly non-stop since then, with great results.
But not perfect! Most of the print defects are due to the MPMD's floating print bed: It literally rests on top of three spring switches that are used for auto-leveling, which, despite having alignment pegs, means the bed has nearly 1 mm of sideways slop, which is enough to create a noticeable layer shift.
The MPMD has other minor imperfections. The first is the noise. Even when not running, the fan in the bottom is surprisingly loud. I modified a 60 mm fan mount design that is in the queue for printing. The noise gets far worse when printing, mainly due to the bushings on the steel rods. My plan is to clean them then lubricate with lithium grease.
The final significant noise source is conducted sound from the steppers. I haven't yet selected a remedy for that, mainly because there are so many to choose from! There are sound-isolating mounts, stepper smoothers, and switching to improved driver chips, such as the Trinamic drivers. There are also things the slicer can do to reduce noise, starting with the acceleration, but also by limiting travel speed. I'll try those first.
As I learn more about 3D printing, I want to twist more of the knobs. On a Marlin system I can permanently tweak the configurations in the source code, and can tweak settings stored in EEPROM, as well as tweak settings during each individual print. The MPMD doesn't use Marlin, though the gcode does appear to be very compatible.
The display on a Marlin system can be used to tweak many settings while the printer is printing, making it much faster and easier to get things dialed-in. The MPMD display does permit a few things to be tweaked, but almost none compared to Marlin. Still, the MPMD display does all the basics quite well, and does so while looking fantastic. It's really great to have a printer display I can read from across the room!
One odd thing is the location of the spool holder onthe back of the printer: The filament has to take a needlessly tortuous path to the extruder I printed a quick bracket that lets my use a paint roller as a spool holder, placing the spool above and in line with the extruder, as well as closer to the printer's center of gravity. A paint roller really is an awesome spool holder.
That loud fan in the base also causes another problem: It blows air directly on the bed heater, meaning it takes longer for the bed to heat up. The hole under the bed heater is easily filled by printing a cup designed for the job, which I found on Thingiverse. The performance difference was immediately noticeable.
Once you adjust the limit switches and get auto-leveling to behave, the MPMD is truly a fantastic value, despite the other minor annoyances (all of which have solutions, or at least work-arounds).
Then again, I'm coming from a 101Hero: ANYTHING else would be a huge step up for me!
Sunday, April 29, 2018
Creating an External Power Monitoring app for Android
I needed to make a power monitoring system to let people know when the AC power to a critical pump had failed.
I realized an old cell phone would be ideal for this task, so long as it ran Android 4.4 (Kit Kat) or later. I found several phones between US$20 and US$30 that would do, and these were either fully-functional used phones, or in one case, a new phone! That's less expensive than a Raspberry Pi, and far more capable, as the phone already includes the cellular modem, the battery system, the display and the touchscreen, not to mention a whole bunch of other sensors and capabilities.
A cheap cell phone is an awesome platform!
The phone would always be plugged into its charger, and the charger would be plugged in to the AC power system to be monitored. When the phone charger loses power, a text would be sent, and another would be sent when power was restored. The only UI needed was for the user to enter the phone number(s) to which the texts would be sent.
Being a Python rapid-development fanboi, I installed SL4A (via the QPython package in Google Play) and soon had a short console script running that did the basics of what was needed.

Simple, right?
Unfortunately, providing this simple script with a GUI and turning it into an installable Android application package (apk) was frustratingly difficult, so I decided to look elsewhere. But at least I now knew it was truly a trivial app, and I expected no significant barriers on the development side.
I installed Android Studio, the standard Android integrated development environment (IDE), and was overwhelmed by the infrastructure needed to create even the simplest app. I'm primarily an embedded/real-time algorithm developer, so I'm used to programming very close to the hardware. There was nothing "simple" here! The Android platform is extremely capable, and is also quite complex.
One very pleasant surprise using Android Studio was my introduction to Kotlin, a language that pretty much eliminates the boilerplate verbosity and bloat of Java without losing any significant features, while delivering an elegant high-productivity language. I want more of this!
For fun, I also installed Visual Studio for Android, mainly to see if Xamarin's Mono would let me use Microsoft's excellent C# language to quickly develop my app. Again, I was unable to get even the simplest demo to load, much less build. And the full installation was nearly 60GB!
I had thought the best way forward would be to get a minimal demo app loaded and built, then modify it to meet my needs. I was beginning to think I had a real problem trying to do even a "simple" thing with these heavy-weight programming environments.
The other recommended Android development alternative was Eclipse for Android. But I've had an ambivalent off-and-on relationship with Eclipse for over a decade. When it works, it's sensational. But when it doesn't work it can be frustrating to remedy. So, no, I didn't bother to install it.
I really wanted a straightforward tool that would take code as simple as the Python above, then with a single click would generate a fully functional apk. I had no need to see behind the curtain, so I wanted a wizard to handle all that stuff for me.
A quick search brought me to App Inventor, the ex-Google now MIT project that used the Scratch programming environment that also has a simple drag'n'drop GUI editor. I had been wanting to play with Scratch anyway, since I plan to help with the local Scratch Day in May. This seemed like an excellent opportunity to meet multiple goals with a single project!
While everything initially went as planned, I soon found there were features of my app that App Inventor would not support. I then learned that App Inventor has not been receiving very much love, and there was little hope the shortcomings would be addressed any time soon.
I was delighted to find that the App Inventor code base (it's Open Source) had been cloned and improved by several groups, all of which could import App Inventor's "aia" project file format. A quick search brought me to Thunkable, where my app both built and ran as expected.
Here's the mockup of the app from the Thunkable GUI editor:

And here's the code that drives the above GUI, with some features added since the Python prototype. Yes, the code is an image: The Scratch language is itself graphical.

App Inventor and it's clones all share multiple ways to test your app: Via USB Debugging, via a WiFi interface app, and via a generated apk that can be installed by scanning a QR Code.
What could be easier!
The last piece of the puzzle was to get the Power Monitoring app to always launch when Android started. The Startup Manager app in Google Play was the right tool for the job, as well as also being able to prevent a slew of default phone apps from starting.
I realized an old cell phone would be ideal for this task, so long as it ran Android 4.4 (Kit Kat) or later. I found several phones between US$20 and US$30 that would do, and these were either fully-functional used phones, or in one case, a new phone! That's less expensive than a Raspberry Pi, and far more capable, as the phone already includes the cellular modem, the battery system, the display and the touchscreen, not to mention a whole bunch of other sensors and capabilities.
A cheap cell phone is an awesome platform!
The phone would always be plugged into its charger, and the charger would be plugged in to the AC power system to be monitored. When the phone charger loses power, a text would be sent, and another would be sent when power was restored. The only UI needed was for the user to enter the phone number(s) to which the texts would be sent.
Being a Python rapid-development fanboi, I installed SL4A (via the QPython package in Google Play) and soon had a short console script running that did the basics of what was needed.
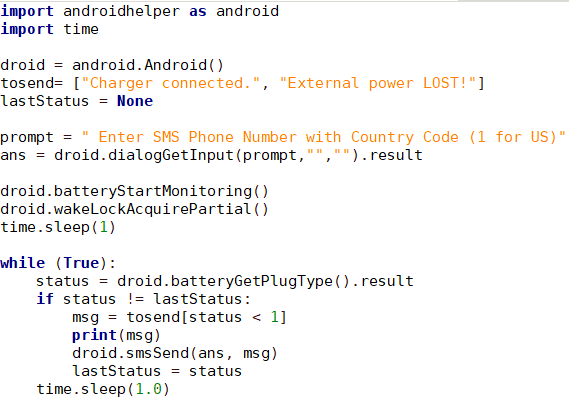
Simple, right?
Unfortunately, providing this simple script with a GUI and turning it into an installable Android application package (apk) was frustratingly difficult, so I decided to look elsewhere. But at least I now knew it was truly a trivial app, and I expected no significant barriers on the development side.
I installed Android Studio, the standard Android integrated development environment (IDE), and was overwhelmed by the infrastructure needed to create even the simplest app. I'm primarily an embedded/real-time algorithm developer, so I'm used to programming very close to the hardware. There was nothing "simple" here! The Android platform is extremely capable, and is also quite complex.
One very pleasant surprise using Android Studio was my introduction to Kotlin, a language that pretty much eliminates the boilerplate verbosity and bloat of Java without losing any significant features, while delivering an elegant high-productivity language. I want more of this!
For fun, I also installed Visual Studio for Android, mainly to see if Xamarin's Mono would let me use Microsoft's excellent C# language to quickly develop my app. Again, I was unable to get even the simplest demo to load, much less build. And the full installation was nearly 60GB!
I had thought the best way forward would be to get a minimal demo app loaded and built, then modify it to meet my needs. I was beginning to think I had a real problem trying to do even a "simple" thing with these heavy-weight programming environments.
The other recommended Android development alternative was Eclipse for Android. But I've had an ambivalent off-and-on relationship with Eclipse for over a decade. When it works, it's sensational. But when it doesn't work it can be frustrating to remedy. So, no, I didn't bother to install it.
I really wanted a straightforward tool that would take code as simple as the Python above, then with a single click would generate a fully functional apk. I had no need to see behind the curtain, so I wanted a wizard to handle all that stuff for me.
A quick search brought me to App Inventor, the ex-Google now MIT project that used the Scratch programming environment that also has a simple drag'n'drop GUI editor. I had been wanting to play with Scratch anyway, since I plan to help with the local Scratch Day in May. This seemed like an excellent opportunity to meet multiple goals with a single project!
While everything initially went as planned, I soon found there were features of my app that App Inventor would not support. I then learned that App Inventor has not been receiving very much love, and there was little hope the shortcomings would be addressed any time soon.
I was delighted to find that the App Inventor code base (it's Open Source) had been cloned and improved by several groups, all of which could import App Inventor's "aia" project file format. A quick search brought me to Thunkable, where my app both built and ran as expected.
Here's the mockup of the app from the Thunkable GUI editor:

And here's the code that drives the above GUI, with some features added since the Python prototype. Yes, the code is an image: The Scratch language is itself graphical.
App Inventor and it's clones all share multiple ways to test your app: Via USB Debugging, via a WiFi interface app, and via a generated apk that can be installed by scanning a QR Code.
What could be easier!
The last piece of the puzzle was to get the Power Monitoring app to always launch when Android started. The Startup Manager app in Google Play was the right tool for the job, as well as also being able to prevent a slew of default phone apps from starting.
Sunday, March 18, 2018
Playing with the Equation for a Circle.
Most of us will immediately recognize the Cartesian form of the equation for a circle (typeset using The Online Equation Editor):

Please notice that the above is an "equation" in Cartesion coordinates, not a "function". There are various functional forms for the circle, such as in polar coordinates, but for the purposes of this post we'll stick with the above equation.
There are four "easy" points for this equation, which occur when each term of the equation is set to zero, in which case the other term is forced to take on values of +1 and -1 (the two real values whose squares equal positive one). These four points are called the "zeros" and occur at the following coordinates:
&space;=&space;(1,0),&space;(0,1),&space;(-1,0),&space;(0,-1) "(x,y) = (1,0), (0,1), (-1,0), (0,-1)")
Here's a plot of the above equation (courtesy of WolframAlpha):
 As expected, we have a circle with radius 1. Take a moment to verify that each of the zeros is indeed present.
Next, let's look at the "generalized" form of this equation, where the common exponent can take on other values:

This represents the family of equations where the exponent of x and y is the same. However, this form has some specific limitations we need to address before we start to play with values for n other than 2.
First, we need to constrain the equation to generate non-negative values so the sum is both real and bounded. For example, if n were odd, such as 3, then negative values of x and y would take on negative values when cubed, which in turn would force the other term to take on larger positive values to obtain the sum of positive 1, yielding a poorly-constrained result.
We will constrain the equation in three ways:
Here's the full form of our generalized, but constrained, equation:
&space;=&space;(-1..1,-1..1)\&space;and\&space;n&space;>0 "|x|^n + |y|^n = 1,\ where\ (x,y) = (-1..1,-1..1)\ and\ n >0")
To be sure we haven't created a monster, let's look at the plot of this equation for the case n = 2:
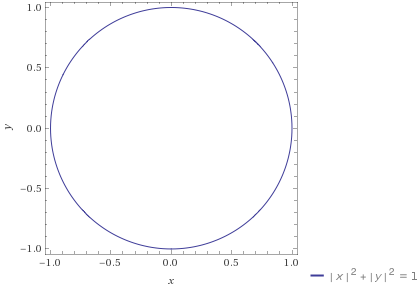 Good! It's still a circle with radius 1.
Notice that the point (0,0) is still at the center, but for this plot I have chosen not to draw the conventional Cartesian axes through (0,0), but I instead used axis labels and legends at the sides of the plot. This was done not only to keep the plot itself as uncluttered as possible (which will become important later), but also to better depict the explicit bounds on x and y. Everything we do going forward will literally be "inside the box".
Ready to play?
Let's start with a look at the plot after setting n = 1:
 Whoa, a diamond? It makes sense when you think about it: This is a linear equation, so these are the four line segments connecting the zero points.
But how did the circle of n = 2 become the diamond of n = 1? Let's look at the plot for a value of n between 2 and 1, say n = 1.5:
 What's this? A "puffy diamond" or a "squeezed circle"? Notice that we obtained a plot for a value of n between 1 and 2 that has a mix of the characteristics for the plots of n = 1 and n = 2. This is not at all guaranteed, and the plots of many generalized equations fail to have this property as clearly evident as it is for this specific simple equation.
OK. So plots for values of n between 1 and 2 also "fall between" the plots for n = 1 and n = 2. What should we expect the plots for values of n < 1 to look like? Let's try n = 0.5:
 Cool! A star! Notice that our four zeros are still there. Also notice that as n has decreased from 2, the "corners" along the diagonals have steadily moved in. Another way to look at this is to view the portions of the plot near the zeros as getting "pointier" as n decreased.
Take a closer look at the legend accompanying the above plot: The exponent of 1/2 has been replaced with a square root radical. This should be a hint for describing the curve in each quadrant. Can you say what curve it is?
Let's look at the plot for a lower value, for n = 0.25:
 Yup, an even pointier star. Perhaps one with a twinkle? It follows our intuition that the plot should get "pointier" at the zeros as the value of n decreases.
What about the plots for n > 2? What does our intuition tell us? A n increases, we should expect the plot at the zeros to get rounder, and the plot diagonals to move further outward. Let's take a look for n = 3:
 What's this? A "square-ish circle" or "circle-ish square"? Actually, the set of plots for all n > 2 has it's own name: They're called "squircles".
Let's double n, and see what happens for n = 6. What do you think it will look like?
 Yup, it's getting more square. Notice that the sides aren't completely flat: They are still ever-so-slightly rounded. But it doesn't look quite like the "rounded squares" we may be used to, where the corners are simply rounded to a circular arc.
Are squircles of any use? In iOS 7, Apple switched their icon outline from a rounded rectangle to a squircle with n = 5:
 Not much of a difference from n = 6, but how about compared to a rounded rectangle?

Ah, see the difference? Which icon shape do you find to be most pleasing? Personally, I find the squircle more elegant, making the rounded square look to have corners at each end of each corner's arc.
Why did Apple make the change? Well, Apple may have wanted to make the change earlier, but it wasn't until iOS7 that most iPhones had screens with high enough resolution to make the difference visible enough to appreciate.
Finally, here's a plot combining the plots for n = {0.25, 0.5, 1, 1.5, 2, 3, 5}, making it more clear how the curves change with n and how the zeros are preserved:

Check Wikipedia and Google to find other uses of squircles. Have fun!
Please notice that the above is an "equation" in Cartesion coordinates, not a "function". There are various functional forms for the circle, such as in polar coordinates, but for the purposes of this post we'll stick with the above equation.
There are four "easy" points for this equation, which occur when each term of the equation is set to zero, in which case the other term is forced to take on values of +1 and -1 (the two real values whose squares equal positive one). These four points are called the "zeros" and occur at the following coordinates:
Here's a plot of the above equation (courtesy of WolframAlpha):
Next, let's look at the "generalized" form of this equation, where the common exponent can take on other values:
This represents the family of equations where the exponent of x and y is the same. However, this form has some specific limitations we need to address before we start to play with values for n other than 2.
First, we need to constrain the equation to generate non-negative values so the sum is both real and bounded. For example, if n were odd, such as 3, then negative values of x and y would take on negative values when cubed, which in turn would force the other term to take on larger positive values to obtain the sum of positive 1, yielding a poorly-constrained result.
We will constrain the equation in three ways:
- Apply the exponent to the absolute value of x and y, instead of the value itself. This will ensure the resulting exponentiation will always yield a positive value.
- Explicitly limit the values of x and y to be in the range of positive and negative 1.
- Limit n to be strictly greater than zero. Please explore for yourself why this is important, though it may be best to wait to do so until after reaching the end of this post.
Here's the full form of our generalized, but constrained, equation:
To be sure we haven't created a monster, let's look at the plot of this equation for the case n = 2:
Notice that the point (0,0) is still at the center, but for this plot I have chosen not to draw the conventional Cartesian axes through (0,0), but I instead used axis labels and legends at the sides of the plot. This was done not only to keep the plot itself as uncluttered as possible (which will become important later), but also to better depict the explicit bounds on x and y. Everything we do going forward will literally be "inside the box".
Ready to play?
Let's start with a look at the plot after setting n = 1:
But how did the circle of n = 2 become the diamond of n = 1? Let's look at the plot for a value of n between 2 and 1, say n = 1.5:
OK. So plots for values of n between 1 and 2 also "fall between" the plots for n = 1 and n = 2. What should we expect the plots for values of n < 1 to look like? Let's try n = 0.5:
Take a closer look at the legend accompanying the above plot: The exponent of 1/2 has been replaced with a square root radical. This should be a hint for describing the curve in each quadrant. Can you say what curve it is?
Let's look at the plot for a lower value, for n = 0.25:
What about the plots for n > 2? What does our intuition tell us? A n increases, we should expect the plot at the zeros to get rounder, and the plot diagonals to move further outward. Let's take a look for n = 3:
Let's double n, and see what happens for n = 6. What do you think it will look like?
Are squircles of any use? In iOS 7, Apple switched their icon outline from a rounded rectangle to a squircle with n = 5:

Ah, see the difference? Which icon shape do you find to be most pleasing? Personally, I find the squircle more elegant, making the rounded square look to have corners at each end of each corner's arc.
Why did Apple make the change? Well, Apple may have wanted to make the change earlier, but it wasn't until iOS7 that most iPhones had screens with high enough resolution to make the difference visible enough to appreciate.
Finally, here's a plot combining the plots for n = {0.25, 0.5, 1, 1.5, 2, 3, 5}, making it more clear how the curves change with n and how the zeros are preserved:

Thursday, December 7, 2017
Puck Fatreon!
I'm boiling mad at Patreon. They just shifted their fee structure in a way that increased the cost of my pledges by a whopping 30%, while simultaneously charging Creators a flat 5% fee. That's 35% of my contribution that does NOT make it to the Creators I sponsor!
I prefer to give many small pledges to a large set of Patreon Creators, rather than larger amounts to a few. I feel this best represents my interests, and also ensures I support the less popular of the Creators I admire.
Until today, I have heard nothing negative from the Creators I sponsor about the cut Patreon takes to process and deliver pledges.
I'm listening, and am acting.
I have now decided Patreon has become a vampire, a leach on the system, and is no longer a suitable platform for supporting Creators.
I have halted all my Patreon pledges.
I hope to soon hear what new funding mechanisms my favored Creators prefer, and I will follow them there.
Go to Hell, Patreon.
OK, I feel better now. The underlying problem would appear to be that the US (and the world?) lacks a cost-effective micro-payments system. Which in turn sets the stage for vampires like Patreon to appear and flourish.
Everything is strangled by the 4 major credit card networks, whose fees are growing despite a reduced cost (as a percentage of money transferred) of doing business in general, and a lower cost of transactions in particular.
The excesses in the credit card system are made perfectly evident by the presence of so many "Cash Rewards" cards, which are simply refunding some of the excess to their customers. If you don't have one, get one soon!
A better route may be to use the ACH (Automatic Clearing House), the network used to process EFTs (Electronic Fund Transfers) such as checks, which has a vastly lower transaction fees (though this comes with lower guarantees by the network itself, which are instead taken up by the financial institutions themselves).
The best route may be to build a new micro-payments network from scratch, or expand an improve an existing one.
The Patreon debacle should hopefully cause some engagement on this important financial infrastructure issue.
I prefer to give many small pledges to a large set of Patreon Creators, rather than larger amounts to a few. I feel this best represents my interests, and also ensures I support the less popular of the Creators I admire.
Until today, I have heard nothing negative from the Creators I sponsor about the cut Patreon takes to process and deliver pledges.
I'm listening, and am acting.
I have now decided Patreon has become a vampire, a leach on the system, and is no longer a suitable platform for supporting Creators.
I have halted all my Patreon pledges.
I hope to soon hear what new funding mechanisms my favored Creators prefer, and I will follow them there.
Go to Hell, Patreon.
OK, I feel better now. The underlying problem would appear to be that the US (and the world?) lacks a cost-effective micro-payments system. Which in turn sets the stage for vampires like Patreon to appear and flourish.
Everything is strangled by the 4 major credit card networks, whose fees are growing despite a reduced cost (as a percentage of money transferred) of doing business in general, and a lower cost of transactions in particular.
The excesses in the credit card system are made perfectly evident by the presence of so many "Cash Rewards" cards, which are simply refunding some of the excess to their customers. If you don't have one, get one soon!
A better route may be to use the ACH (Automatic Clearing House), the network used to process EFTs (Electronic Fund Transfers) such as checks, which has a vastly lower transaction fees (though this comes with lower guarantees by the network itself, which are instead taken up by the financial institutions themselves).
The best route may be to build a new micro-payments network from scratch, or expand an improve an existing one.
The Patreon debacle should hopefully cause some engagement on this important financial infrastructure issue.
Friday, December 1, 2017
How and Why Did I Become an Engineer?
During a recent interview I was asked why I had become an engineer. In that context I gave a few key reasons. Here's the full story.
In high school back in the early 1970's I loved all things Science and Math, but of them all I liked Biology best, by far. When I got to take a computer programming class (using FORTRAN IV), the first program I wrote on my own was to help me calculate the metabolic rates of the rats were were raising in the Biology lab. At that point, I saw programming as a useful tool to know, but not as anything I'd want to pursue as a career.
After high school I chose to join the US Navy rather than go directly to college. There were many reasons encouraging me toward this path, and it turned out to be fantastically right for me. While in the Navy I was trained in several areas, including Nuclear Propulsion. I got to operate a nuclear reactor at the tender age of 19! I also learned lots about gyrocompasses, jet engine control systems, other types of electronics, mechanical and hydraulic system, and a ton of engineering in general.
As I was nearing 6 years in the Navy, I realized I was more than ready to start college. During my last year in the Navy I bought an Apple ][+ with the Language Card and UCSD Pascal. My experience with Pascal was so different from my days with FORTRAN that I immediately knew I wanted to write software for a living. I chose to attend UCSD because I wanted to be associated with a school that not only developed useful technology, but also got it into people's hands.
While applying to UCSD I learned about their Computer Engineering degree, which combined all of a Computer Science degree with the digital half of an Electrical Engineering degree. It let me combine my desire to write software with my military engineering experience.
Upon arriving at UCSD I was immediately overwhelmed. Six years away from high school had taken a toll, and I was far from ready for the rigor of an academic environment. As a Freshman I was struggling to get through the brick wall of the Math sequence, though I had lots of fun with the Physics sequence, particularly the associated lab class.
In my Sophomore year I got to start on some of my technical electives, so I decided to revisit my first science love, Biology. I was extraordinarily fortunate to be taught by Dr. Paul Saltman, a world-renowned molecular biologist who loved to teach undergraduates. I took to the class like a fish to water, my mind absorbing the concepts like a dry sponge, and I aced nearly every test.
Dr. Saltman was unusual in that he created his post-test answer key using not his own answers, but the best of the student answers. I didn't know this at the time of the first mid-term exam, and was surprised to hear my name and several others were called to meet with the professor one day after class. He told us of his answer key approach, and asked if he could use our answers. Of course we all agreed! He then went around the group asking what year we were and what our majors were. It went something like: "Biology", "Bio-Chemistry", "Molecular Biology", "Biological Physics", and when he got to me, I said "Computer Engineering", the only non-bio major in the group.
The same thing happened again for the answer key on the second mid-term, and Dr. Saltman started trying to convince me to switch majors. This was two class sequence, and in the second class he really turned up the pressure, even inviting me to work in his lab if I changed my major!
I kept saying no, but I didn't really have a set of reasons he would understand, much less accept. Then I finally came up with an analogy that worked!
I told him that every time I tested a program I was developing, it could crash and burn in any of a long list of ways, not only ending the program, but sometimes also causing the host system to lockup and reboot. Were I to do similar experimentation in a biology lab, I told him I'd need a Biosafety Level Five containment system. Unfortunately, the Biosafety levels top out at 4. He agreed his profession, and likely the planet, would be safer were I to stay with software, where at least we can pull the plug on the computer.
My engineering experience pointed me toward writing software that interfaced directly with the real world via sensors and actuators, rather than interacting with "users". These are called "embedded" systems, and often require the software to work as fast as things happen in the real-world, called "real-time". So I called myself an embedded/real-time systems developer.
My education, experience and career desires came together in my first job after college: I was hired by General Atomics to write software for radiation monitoring systems for commercial nuclear power plants. I next worked on nuclear reactor monitoring and control systems for a new Navy nuclear submarine. At my next job I worked on automated X-Ray inspections systems for munitions, and on a neutron beam system used to inspect aircraft wings for corrosion.
I've also worked on ultra-high-speed digital video cameras (100,000 fps), on instruments for aircraft, on satellite electronics (for a mission that unfortunately never launched), communication systems for small UAVs, and on many other fascinating systems.
I had many opportunities to step into management roles, but I always chose, perhaps selfishly, to remain a software developer specializing in instrumentation and embedded/real-time systems.
My focus on instrumentation meant I did only a minimum of user interface and web development, and no mobile development at all (other than writing the occasional device driver). I wrote no business or enterprise software, and had only a minimal grasp of IT principles.
While there will always be a need for instrumentation software, my specialization forms an ever smaller fraction of the overall software development landscape. Which has made job searches increasingly more difficult, and interviews more frustrating, as fewer HR people know how to specify and fill positions for instrumentation developers.
That's not to say there's no hope! The explosion of the Arduino and now the Raspberry Pi into the hobbyist market bodes well for a healthy population of embedded/real-time system developers.
After 30 years I'm finding that choosing to stay out of management has made me a relative fossil among the applicants for instrumentation/embedded/real-time developer positions. Rather than beat my head against the wall, I've instead decided to take my skills and experience in a new direction: I'm going to become a STEM teacher, and see how many folks I can convince to become the next generation of engineers!
In high school back in the early 1970's I loved all things Science and Math, but of them all I liked Biology best, by far. When I got to take a computer programming class (using FORTRAN IV), the first program I wrote on my own was to help me calculate the metabolic rates of the rats were were raising in the Biology lab. At that point, I saw programming as a useful tool to know, but not as anything I'd want to pursue as a career.
After high school I chose to join the US Navy rather than go directly to college. There were many reasons encouraging me toward this path, and it turned out to be fantastically right for me. While in the Navy I was trained in several areas, including Nuclear Propulsion. I got to operate a nuclear reactor at the tender age of 19! I also learned lots about gyrocompasses, jet engine control systems, other types of electronics, mechanical and hydraulic system, and a ton of engineering in general.
As I was nearing 6 years in the Navy, I realized I was more than ready to start college. During my last year in the Navy I bought an Apple ][+ with the Language Card and UCSD Pascal. My experience with Pascal was so different from my days with FORTRAN that I immediately knew I wanted to write software for a living. I chose to attend UCSD because I wanted to be associated with a school that not only developed useful technology, but also got it into people's hands.
While applying to UCSD I learned about their Computer Engineering degree, which combined all of a Computer Science degree with the digital half of an Electrical Engineering degree. It let me combine my desire to write software with my military engineering experience.
Upon arriving at UCSD I was immediately overwhelmed. Six years away from high school had taken a toll, and I was far from ready for the rigor of an academic environment. As a Freshman I was struggling to get through the brick wall of the Math sequence, though I had lots of fun with the Physics sequence, particularly the associated lab class.
In my Sophomore year I got to start on some of my technical electives, so I decided to revisit my first science love, Biology. I was extraordinarily fortunate to be taught by Dr. Paul Saltman, a world-renowned molecular biologist who loved to teach undergraduates. I took to the class like a fish to water, my mind absorbing the concepts like a dry sponge, and I aced nearly every test.
Dr. Saltman was unusual in that he created his post-test answer key using not his own answers, but the best of the student answers. I didn't know this at the time of the first mid-term exam, and was surprised to hear my name and several others were called to meet with the professor one day after class. He told us of his answer key approach, and asked if he could use our answers. Of course we all agreed! He then went around the group asking what year we were and what our majors were. It went something like: "Biology", "Bio-Chemistry", "Molecular Biology", "Biological Physics", and when he got to me, I said "Computer Engineering", the only non-bio major in the group.
The same thing happened again for the answer key on the second mid-term, and Dr. Saltman started trying to convince me to switch majors. This was two class sequence, and in the second class he really turned up the pressure, even inviting me to work in his lab if I changed my major!
I kept saying no, but I didn't really have a set of reasons he would understand, much less accept. Then I finally came up with an analogy that worked!
I told him that every time I tested a program I was developing, it could crash and burn in any of a long list of ways, not only ending the program, but sometimes also causing the host system to lockup and reboot. Were I to do similar experimentation in a biology lab, I told him I'd need a Biosafety Level Five containment system. Unfortunately, the Biosafety levels top out at 4. He agreed his profession, and likely the planet, would be safer were I to stay with software, where at least we can pull the plug on the computer.
My engineering experience pointed me toward writing software that interfaced directly with the real world via sensors and actuators, rather than interacting with "users". These are called "embedded" systems, and often require the software to work as fast as things happen in the real-world, called "real-time". So I called myself an embedded/real-time systems developer.
My education, experience and career desires came together in my first job after college: I was hired by General Atomics to write software for radiation monitoring systems for commercial nuclear power plants. I next worked on nuclear reactor monitoring and control systems for a new Navy nuclear submarine. At my next job I worked on automated X-Ray inspections systems for munitions, and on a neutron beam system used to inspect aircraft wings for corrosion.
I've also worked on ultra-high-speed digital video cameras (100,000 fps), on instruments for aircraft, on satellite electronics (for a mission that unfortunately never launched), communication systems for small UAVs, and on many other fascinating systems.
I had many opportunities to step into management roles, but I always chose, perhaps selfishly, to remain a software developer specializing in instrumentation and embedded/real-time systems.
My focus on instrumentation meant I did only a minimum of user interface and web development, and no mobile development at all (other than writing the occasional device driver). I wrote no business or enterprise software, and had only a minimal grasp of IT principles.
While there will always be a need for instrumentation software, my specialization forms an ever smaller fraction of the overall software development landscape. Which has made job searches increasingly more difficult, and interviews more frustrating, as fewer HR people know how to specify and fill positions for instrumentation developers.
That's not to say there's no hope! The explosion of the Arduino and now the Raspberry Pi into the hobbyist market bodes well for a healthy population of embedded/real-time system developers.
After 30 years I'm finding that choosing to stay out of management has made me a relative fossil among the applicants for instrumentation/embedded/real-time developer positions. Rather than beat my head against the wall, I've instead decided to take my skills and experience in a new direction: I'm going to become a STEM teacher, and see how many folks I can convince to become the next generation of engineers!
Wednesday, November 22, 2017
The Path to Becoming a STEM Teacher.
Those who've seen my recent Facebook posts know I finally decided to become a triathlon coach, with the intent to focus on beginners and data-driven coaching. Literally days after making that decision I received a newsletter from Code.org mentioning that EnCorps was recruiting STEM teachers from the sci/tech community.
I immediately thought: "Woah. Teachers get summers off. I could coach more during race season!"
Then I thought about the state of my career, and that it may be time for a major change. Over the past few years I've been encountering significant ageism now that I've become an "older" engineer seeking permanent or contract work. It's certainly not as easy for me to find new business as it used to be! I call it ageism because I know for a fact my skills are relevant in the market: Some recent job descriptions look as though they were pulled from my resume! Yet I'm not getting many interviews, not even phone interviews.
EnCorps gave me a phone interview last Monday, a few day after I completed the online application, and they've scheduled an in-face interview for next Wednesday. The feedback I've received from the EnCorps SoCal recruiter has been totally enthusiastic, despite the fact that only about 18% of EnCorps applicants make it to the classroom.
Still, it is nice to be wanted. I had almost forgotten what it felt like.
I started down this path primarily out of curiosity. I'm getting more excited with each passing day, but also more aware of the huge amount of work ahead and the great responsibilities to come.
But why leave engineering? It is what I've loved doing for over 30 years, and it forms a core part of my identity. It is also been the most fun I could ever imagine getting paid for! Being an engineer has been the perfect fit for me.
I've had to look very closely at my motivations and the downsides. It could be that I'll be a terrible teacher, though I honestly believe I'll do fine. I've had several teaching experiences during my career, and they all turned out well. I greatly enjoyed them, and my students did too.
Truth be told, I have hobby projects that will keep me neck-deep in hands-on engineering for years to come. Many of these projects were started so I could learn and apply new technologies, both for fun and for professional development.
I've also been advising crowdfunding projects, participating in several science and tech forums, and answering questions on some of the StackExchange sites. Which, when you think about it and squint just right, could look a bit more like teaching than engineering. I wonder if I've been on this path for a while, and simply failed to see it for what it was? Perhaps, but I suspect it's simply how I like to fill my time. Still, it is relevant.
I'm moving forward with a career switch to STEM teaching. Wish me luck!
I immediately thought: "Woah. Teachers get summers off. I could coach more during race season!"
Then I thought about the state of my career, and that it may be time for a major change. Over the past few years I've been encountering significant ageism now that I've become an "older" engineer seeking permanent or contract work. It's certainly not as easy for me to find new business as it used to be! I call it ageism because I know for a fact my skills are relevant in the market: Some recent job descriptions look as though they were pulled from my resume! Yet I'm not getting many interviews, not even phone interviews.
EnCorps gave me a phone interview last Monday, a few day after I completed the online application, and they've scheduled an in-face interview for next Wednesday. The feedback I've received from the EnCorps SoCal recruiter has been totally enthusiastic, despite the fact that only about 18% of EnCorps applicants make it to the classroom.
Still, it is nice to be wanted. I had almost forgotten what it felt like.
I started down this path primarily out of curiosity. I'm getting more excited with each passing day, but also more aware of the huge amount of work ahead and the great responsibilities to come.
But why leave engineering? It is what I've loved doing for over 30 years, and it forms a core part of my identity. It is also been the most fun I could ever imagine getting paid for! Being an engineer has been the perfect fit for me.
I've had to look very closely at my motivations and the downsides. It could be that I'll be a terrible teacher, though I honestly believe I'll do fine. I've had several teaching experiences during my career, and they all turned out well. I greatly enjoyed them, and my students did too.
Truth be told, I have hobby projects that will keep me neck-deep in hands-on engineering for years to come. Many of these projects were started so I could learn and apply new technologies, both for fun and for professional development.
I've also been advising crowdfunding projects, participating in several science and tech forums, and answering questions on some of the StackExchange sites. Which, when you think about it and squint just right, could look a bit more like teaching than engineering. I wonder if I've been on this path for a while, and simply failed to see it for what it was? Perhaps, but I suspect it's simply how I like to fill my time. Still, it is relevant.
I'm moving forward with a career switch to STEM teaching. Wish me luck!
Sunday, November 12, 2017
Failure Modes for Self-Driving Cars: It's All About "Situational Awareness"!
There has been lots of recent discussion concerning when and how self-driving cars should return control to the driver, and how this process should work in a variety of scenarios.
I won't be discussing truly autonomous vehicles, which by definition have only passengers, not drivers. Self-driving cars, in my use of the term here, always require the presence of a licensed driver, and completely support operation as conventional cars. I'll use the term "autopilot" (as in the aircraft and Tesla sense) to more clearly distinguish "autonomous" from "self-driving" vehicles.
The first and most important scenario concerns the rapid and total failure of the autopilot system, where control of the vehicle suddenly shifts to the driver.
Even if the car has independent and hardened emergency systems to help out when the autopilot ceases to function normally (either because of damage or exceeding its capabilities), there is always the (low) chance that such backup systems will all fail when the autopilot does.
I remember well the first time I bought an older luxury car with all the nifty powered accessories. It was also my first car with working A/C. I was so proud of it, as it was a huge step up from the junkers I had been driving and endlessly fixing.
Late one evening while driving on the highway at speed, the battery cable fell off and hit the body, shorting the entire electrical system to ground. (I later found the entire battery post had fallen off!)
The headlights and dash lights went out, and I initially felt blinded. Cruise control cut-out and the car started slowing. I had no power steering and the car started drifting out of its lane. Gas pedal response was sluggish and the engine started running rough. The automatic transmission wouldn't shift automatically.
It was only my experience with a series of junker cars that saved me. While I never before had everything die all at once, it wasn't rare for one thing or another to go wrong for me during a drive. Pretty much every car system had failed for me at least once. In the back of my mind I was always running sub-conscious "what if" scenarios, and adjusting my driving to avoid traffic situations that could make a failure worse.
I firmly gripped the steering wheel and started "driving by Braille" while my eyes adjusted. Fortunately I was in California, which has "Blot's Dots" bumps and reflectors glued between the lanes and at the outer edges. While the headlights of the cars near me helped, it still took about a full second for my eyes to adapt to the metropolitan sky glow well enough to see the road immediately in front of me.
I had no brake lights; I knew the greatest hazard was the cars behind me and next to me, so I didn't want to slow down too quickly. I applied some gas and tried to get the transmission to shift (it did respond to manual input). Only after I reached the shoulder did I apply the brakes and come to a complete stop.
Now, let's instead say I was in a Tesla, with full Autopilot Mode active, when the battery pack suddenly became completely disabled (not really possible, but work with me here). This raises two main questions:
1) What parts of this scenario can or should be handled by the "dead" self-driving system?
2) How can the driver be kept ready to cope with the "total failure" situation?
Let's discuss the first one first: Before we can trust a self-driving system to self-drive, we must first trust the self-driving system to exit self-drive mode and bring the car to a safe stop, even without driver help.
This means the car will likely need two separate systems: The self-drive system, and a separate emergency system that monitors both the self-drive system and the driver and on its own can safely bring the car to a halt. This emergency system must:
- Have its own controller, wiring and power source, separate from the rest of the car.
- Be able to take steering, propulsion and brake control away from a failed self-drive system.
- Work long enough to get the car from speed down to a safe stop, preferably at a safe location.
- Allow the driver to take control at any time.
- Encourage (not force) the driver to take control when the emergency system itself lacks control of steering and/or brakes (electrical regen and/or mechanical).
There are many other things such an emergency system must do, but they are at a lower priority than the above. For example, such a system should also snug the seatbelts to ensure the driver is in the right position to take control and (worst case) be ready for airbag deployment. The system should also pose minimal risk to other traffic by doing its maneuvers in ways that enable other drivers to safely respond (avoid causing accidents).
Such systems already exist and are in common use in other industries. For example, virtually all industrial robots have independent safety monitoring systems that prevent the robot from harming itself or its environment, especially people nearby. And NASA has for over half a century pioneered such emergency control systems for aircraft and spacecraft.
Now let's look at the second situation: Even the best emergency backup systems can fail. Fortunately, old technologies (and existing regulations) ensure the driver can establish emergency control over steering and brakes. This situation now becomes ensuring the driver is ready to take control.
The emergency backup system is a form of "active" safety. Before digging deeper, let's talk about "passive" safety systems: When all else goes wrong (but no collision has occurred), the mechanical systems themselves can provide safer vehicle behavior. The most familiar examples of this are:
1. The mechanical design and construction of the steering system, where the wheels gradually come to center when the driver (or autopilot) is not exerting direct control.
2. The design of the accelerator and brakes, so that neither engages without the driver (or autopilot) exerting direct control: The vehicle passively glides to a stop when active control is absent.
Clearly, every self-driving car must preserve all existing passive safety features. That's actually a significant design complication, that the self-driving actuators by default are safely inactive whenever power or positive control is removed.
Very few drivers today have any experience with unreliable cars. Cars built over the past 30 years have amazingly low failure rates (assuming you promptly handle all recalls), leading to exceptionally high reliability and driver confidence.
Can we maintain driver confidence, and create such confidence for autopilot systems, while simultaneously keeping the driver ready to take over during a total system failure?
Here's where we finally discuss the title of this post, "situational awareness". In this case, situational awareness means the driver is continuously informed about, and consciously aware of, the status of the car and the state of the current driving environment. This level of awareness must especially be maintained while in self-driving mode, when the driver may be focused on other activities.
It is important to understand that awareness is always changing; it fades with time and must be actively refreshed. The best possible awareness comes only when in full manual control: In all other fully- or semi-automated driving modes, the driver will inherently and inevitably have a significantly reduced level of situational awareness.
The goal then becomes keeping the driver at a "good enough" level of situational awareness that will enable prompt switching to the full, manual control level of situational awareness.
Increasing our level of situational awareness is perhaps one of the hardest tasks for the human mind to do in real-time. It involves not only refocusing our senses, but also activating our musculature, and even changing our posture.
Here's the worst case, the stuff of nightmares: Imagine being asleep, then waking up in the cockpit of a race car in the middle of a race. Your ears are filled not just with the noises of the car, but also of the other race cars and maybe even the crowd. Your eyes are assaulted by the brightly lit race course filled with weaving cars, as well as a dash filled with a huge number of gauges. Your hands feel the shake of the steering wheel as you compulsively tighten your grip. And who knows what your legs and feet are doing!
Clearly, the first thing is to not make the situation worse. There must be no visual or audible distractions that get in the way of dealing with the situation: Alarms must be very noticeable, but not shockingly loud or bright.
OK, so that's the worst case when a loss of autopilot happens. How can we best be prepared for it? And do so without removing the benefits of self-driving?
Well, obviously the driver must be awake. Not only that, but the driver must also be alert enough to take control. The only way I know of to positively ensure this with any degree of reliability is by interactive testing (not via passive monitoring, as others have suggested). The driver must occasionally take actual full control of the vehicle, or at least demonstrate a precisely equivalent level of readiness by other means.
More importantly, this is not just about manual driving: It is about ensuring the driver is capable of smoothly and safely transitioning from self-driving mode into manual driving. It's about the process of taking control, a precursor step to to the process of manual driving.
To me, this means the modes of the autopilot can't be simply "on" and "off". It should have the initial mode of "taking automatic control" and the final mode of "surrendering automatic control". This last mode should, to the greatest extent possible, also be part of the emergency system.
If the driver can't successfully follow the "surrendering automatic control" process, the system should not turn control over to the driver, and should instead perform an alternative action (continue driving, pull over safely, etc.).
I won't be discussing truly autonomous vehicles, which by definition have only passengers, not drivers. Self-driving cars, in my use of the term here, always require the presence of a licensed driver, and completely support operation as conventional cars. I'll use the term "autopilot" (as in the aircraft and Tesla sense) to more clearly distinguish "autonomous" from "self-driving" vehicles.
The first and most important scenario concerns the rapid and total failure of the autopilot system, where control of the vehicle suddenly shifts to the driver.
Even if the car has independent and hardened emergency systems to help out when the autopilot ceases to function normally (either because of damage or exceeding its capabilities), there is always the (low) chance that such backup systems will all fail when the autopilot does.
I remember well the first time I bought an older luxury car with all the nifty powered accessories. It was also my first car with working A/C. I was so proud of it, as it was a huge step up from the junkers I had been driving and endlessly fixing.
Late one evening while driving on the highway at speed, the battery cable fell off and hit the body, shorting the entire electrical system to ground. (I later found the entire battery post had fallen off!)
The headlights and dash lights went out, and I initially felt blinded. Cruise control cut-out and the car started slowing. I had no power steering and the car started drifting out of its lane. Gas pedal response was sluggish and the engine started running rough. The automatic transmission wouldn't shift automatically.
It was only my experience with a series of junker cars that saved me. While I never before had everything die all at once, it wasn't rare for one thing or another to go wrong for me during a drive. Pretty much every car system had failed for me at least once. In the back of my mind I was always running sub-conscious "what if" scenarios, and adjusting my driving to avoid traffic situations that could make a failure worse.
I firmly gripped the steering wheel and started "driving by Braille" while my eyes adjusted. Fortunately I was in California, which has "Blot's Dots" bumps and reflectors glued between the lanes and at the outer edges. While the headlights of the cars near me helped, it still took about a full second for my eyes to adapt to the metropolitan sky glow well enough to see the road immediately in front of me.
I had no brake lights; I knew the greatest hazard was the cars behind me and next to me, so I didn't want to slow down too quickly. I applied some gas and tried to get the transmission to shift (it did respond to manual input). Only after I reached the shoulder did I apply the brakes and come to a complete stop.
Now, let's instead say I was in a Tesla, with full Autopilot Mode active, when the battery pack suddenly became completely disabled (not really possible, but work with me here). This raises two main questions:
1) What parts of this scenario can or should be handled by the "dead" self-driving system?
2) How can the driver be kept ready to cope with the "total failure" situation?
Let's discuss the first one first: Before we can trust a self-driving system to self-drive, we must first trust the self-driving system to exit self-drive mode and bring the car to a safe stop, even without driver help.
This means the car will likely need two separate systems: The self-drive system, and a separate emergency system that monitors both the self-drive system and the driver and on its own can safely bring the car to a halt. This emergency system must:
- Have its own controller, wiring and power source, separate from the rest of the car.
- Be able to take steering, propulsion and brake control away from a failed self-drive system.
- Work long enough to get the car from speed down to a safe stop, preferably at a safe location.
- Allow the driver to take control at any time.
- Encourage (not force) the driver to take control when the emergency system itself lacks control of steering and/or brakes (electrical regen and/or mechanical).
There are many other things such an emergency system must do, but they are at a lower priority than the above. For example, such a system should also snug the seatbelts to ensure the driver is in the right position to take control and (worst case) be ready for airbag deployment. The system should also pose minimal risk to other traffic by doing its maneuvers in ways that enable other drivers to safely respond (avoid causing accidents).
Such systems already exist and are in common use in other industries. For example, virtually all industrial robots have independent safety monitoring systems that prevent the robot from harming itself or its environment, especially people nearby. And NASA has for over half a century pioneered such emergency control systems for aircraft and spacecraft.
Now let's look at the second situation: Even the best emergency backup systems can fail. Fortunately, old technologies (and existing regulations) ensure the driver can establish emergency control over steering and brakes. This situation now becomes ensuring the driver is ready to take control.
The emergency backup system is a form of "active" safety. Before digging deeper, let's talk about "passive" safety systems: When all else goes wrong (but no collision has occurred), the mechanical systems themselves can provide safer vehicle behavior. The most familiar examples of this are:
1. The mechanical design and construction of the steering system, where the wheels gradually come to center when the driver (or autopilot) is not exerting direct control.
2. The design of the accelerator and brakes, so that neither engages without the driver (or autopilot) exerting direct control: The vehicle passively glides to a stop when active control is absent.
Clearly, every self-driving car must preserve all existing passive safety features. That's actually a significant design complication, that the self-driving actuators by default are safely inactive whenever power or positive control is removed.
Very few drivers today have any experience with unreliable cars. Cars built over the past 30 years have amazingly low failure rates (assuming you promptly handle all recalls), leading to exceptionally high reliability and driver confidence.
Can we maintain driver confidence, and create such confidence for autopilot systems, while simultaneously keeping the driver ready to take over during a total system failure?
Here's where we finally discuss the title of this post, "situational awareness". In this case, situational awareness means the driver is continuously informed about, and consciously aware of, the status of the car and the state of the current driving environment. This level of awareness must especially be maintained while in self-driving mode, when the driver may be focused on other activities.
It is important to understand that awareness is always changing; it fades with time and must be actively refreshed. The best possible awareness comes only when in full manual control: In all other fully- or semi-automated driving modes, the driver will inherently and inevitably have a significantly reduced level of situational awareness.
The goal then becomes keeping the driver at a "good enough" level of situational awareness that will enable prompt switching to the full, manual control level of situational awareness.
Increasing our level of situational awareness is perhaps one of the hardest tasks for the human mind to do in real-time. It involves not only refocusing our senses, but also activating our musculature, and even changing our posture.
Here's the worst case, the stuff of nightmares: Imagine being asleep, then waking up in the cockpit of a race car in the middle of a race. Your ears are filled not just with the noises of the car, but also of the other race cars and maybe even the crowd. Your eyes are assaulted by the brightly lit race course filled with weaving cars, as well as a dash filled with a huge number of gauges. Your hands feel the shake of the steering wheel as you compulsively tighten your grip. And who knows what your legs and feet are doing!
Clearly, the first thing is to not make the situation worse. There must be no visual or audible distractions that get in the way of dealing with the situation: Alarms must be very noticeable, but not shockingly loud or bright.
OK, so that's the worst case when a loss of autopilot happens. How can we best be prepared for it? And do so without removing the benefits of self-driving?
Well, obviously the driver must be awake. Not only that, but the driver must also be alert enough to take control. The only way I know of to positively ensure this with any degree of reliability is by interactive testing (not via passive monitoring, as others have suggested). The driver must occasionally take actual full control of the vehicle, or at least demonstrate a precisely equivalent level of readiness by other means.
More importantly, this is not just about manual driving: It is about ensuring the driver is capable of smoothly and safely transitioning from self-driving mode into manual driving. It's about the process of taking control, a precursor step to to the process of manual driving.
To me, this means the modes of the autopilot can't be simply "on" and "off". It should have the initial mode of "taking automatic control" and the final mode of "surrendering automatic control". This last mode should, to the greatest extent possible, also be part of the emergency system.
If the driver can't successfully follow the "surrendering automatic control" process, the system should not turn control over to the driver, and should instead perform an alternative action (continue driving, pull over safely, etc.).
Sunday, November 5, 2017
Writing Documentation That Doesn't Suck
I've often had to write manuals for the products I've developed. The Technical/Maintenance manual is easiest (because the audience is technical), and the User/Operations Manual is by far the hardest (anyone can be a user).
Like many engineers, I took the minimum number of required writing classes. So it was not a huge surprise that my initial attempts at product documentation were terrible. Over time I finally became "not horrible" at documentation, and the main path to success was to avoid saying too much!
There are many technical writing guidelines online, but I find most are too narrowly focused to be of general use. A few simple guidelines are generally enough to avoid documentation disaster.
Here are some guidelines that have served me well:
Here are some guidelines that have served me well:
- "Don't write so that you can be understood, write so that you can't be misunderstood." William Howard Taft
This is partly about getting inside your reader's head, and partly about getting out of your own. It is all too easy to write for people who are near-clones of yourself, and forget the wide range of other folks on the planet.
It's about making your writing as "simple and obvious" as possible. Avoid long-winded explanations when a couple short, carefully-crafted sentences will do the job. That said, always use however many words are needed to make each point clearly and concisely.
Important things may need to be said more than once. What I typically do is "say it once", then show an illustration, then explain the illustration, and finally summarize what was just done (what success looks like).
- Have some "fresh eyes" available.
Given that we can't understand all possible readers, we must remember that we only truly care about the first-time reader. That means at least some of the folks who review our work must also be as close to a first-time reader as possible.
In particular, this means it must be simple and easy for actual users to provide feedback on the manual itself. Encourage each customer to print and mark-up the instructions, and tell them how to get their input back to you (email, forum, etc.).
- Include a glossary.
It is way too easy to use too many technical terms, and too hard to get rid of them. Having a glossary and always keeping it current is a great way to track specialty terms and language.
- Don't get tied down to a Table of Contents: Make it the last thing you generate.
Too many folks start with a Table of Contents as the plan for the document. This is backwards! The document should have whatever organization and structure it needs to get its job done, and the flow is expected to change with time.
That said, it is important to have a "ToDo List" for the document, a detailed set of goals for what must be included and not left out.
Of course, organization is needed, but primarily at the lower levels:
o What is the purpose of this step?
o What tools and parts are needed to accomplish this step?
o What things must I do?
o How can I verify that I did it correctly?
o What is the purpose of this step?
o What tools and parts are needed to accomplish this step?
o What things must I do?
o How can I verify that I did it correctly?
- There is no such thing as too many good illustrations.
However, there is such a thing as too many bad illustrations! The old saying "A picture is worth a thousand words" isn't totally wrong, but having a picture doesn't mean words aren't necessary. Illustrations should add context and meaning to words, not replace them.
For something like kit assembly, there are going to be situations that words can't express in an understandable way. This is when illustrations matter most, so take the time to create lots of candidates and choose the best. Try to avoid the "one and done" attitude to images or drawings.
- Layout matters! But not until close to the end.
One important goal is to not force the reader to have to flip back and forth between pages to understand what's going on. Text mixed with images? Images and text in separate columns? Size? Pagination? These are all important to the reader, but not unless and until the needed information is already present in the document.
- Documentation is really about "teaching", not "telling".
The user has goals, and the documentation must ensure the user will meet those goals with minimal confusion, and minimal need to ask for help. For kit assembly, the initial steps should train the user to become a good assembler, not merely get things put together.
Not all of us learn in the same way, and there are a number of ways by which we learn. These ways are called "learning modalities" (or "learning styles"), and while we all have access to all them, some work much better than others, and which ones do best will vary between individuals.
It is often necessary to say a thing in different ways (words, pictures) in order to engage multiple modalities. It is also important to help the user sharpen the modalities that will be most useful, and that's where training comes in. Take time at the start to build the skills the user will need before making use of them. Even the fundamentals matter:
o What is an "M4 screw"? Is a screw different than a bolt?
o What does it mean to "tighten a screw"? How tight is tight enough? How tight is too tight?
o What does it mean to "crimp a connection"? How can I tell if I did it right?
o What is an "M4 screw"? Is a screw different than a bolt?
o What does it mean to "tighten a screw"? How tight is tight enough? How tight is too tight?
o What does it mean to "crimp a connection"? How can I tell if I did it right?
Sunday, October 22, 2017
SexyCyborg: Causing Continual Cultural Conflict
I want to talk a bit about Naomi Wu, a Shenzhen freelance programmer, a Maker, a model and a vlogger, who added an enormous pair of 800 ml breast implants to her already abundant good looks and then established her YouTube persona as SexyCyborg.
When appearing in public, she often wears the tiniest of nano-shorts and a crop-top revealing a slice of under-boob. At pool parties, her bikini consists of little more than strings.
Naomi is intentionally stirring the interfaces between Makers, engineers, culture, sexism and more. She has many goals in her life, but the one that fascinates me most is her goal to level the playing field for everyone, female and male, young and old, newbie and expert, both as Makers and in life in general.
I support her on Patreon, and I want to be clear about the reasons why.
There is one enormously important item missing the above list:
When appearing in public, she often wears the tiniest of nano-shorts and a crop-top revealing a slice of under-boob. At pool parties, her bikini consists of little more than strings.
Naomi is intentionally stirring the interfaces between Makers, engineers, culture, sexism and more. She has many goals in her life, but the one that fascinates me most is her goal to level the playing field for everyone, female and male, young and old, newbie and expert, both as Makers and in life in general.
I support her on Patreon, and I want to be clear about the reasons why.
- She's a female Maker pushing her way into a global phenomenon still dominated by white Western sexist male culture.
- She's a talented self-taught Maker who works in multiple areas, from software, to 3D design and printing, to wearables, to work tables and shelves.
- She's a Maker on the inside of the Great Chinese Firewall.
There is one enormously important item missing the above list:
- Inspiring Makers of all ages, especially female Makers, to pursue their interests despite gender-based or age-based resistance.
I'm making it sound like it's all about Naomi Wu, SexyCyborg. It isn't. It's also about me. It's about how I view Makers and how I view women, and how confused I used to get when both appeared in a single package.
I always thought of myself as an unbiased person, free from common prejudice. But Naomi arrived like a stick in my eye, jumbling my perceptions, causing me to uncomfortably flip between "Wow, cool Maker" and "Wow, hot woman" as if they were two different things.
I can't count the times Naomi has made very clear the differences between how people in Shenzhen respond to her appearance compared to Western males. The charming videos with kids and "Aunties" were one thing, but the lack of drooling, leering looks from Shenzhen males when she walked in public finally made the point clear to me. The only leering looks I can recall in any of her videos came primarily from the Western expats at her pool party modeling gigs.
So, what's the difference between Shenzhen men and Western men? Is there a difference I can find, understand, learn from, and put to good use? Well, I'm far from Shenzhen, and don't speak either Mandarin or Cantonese, so direct research is difficult. I started by rewatching Naomi's videos, and well as videos by other Asian vloggers, both locals and expats.
I was most impressed with the videos by Western expats who had chosen to live in China long-term; had built a career; had married a local; had started a family. How their videos changed from the earliest to the most recent. And how they and their spouses reacted during trips to the West.
Then I viewed Naomi's videos again, especially her 360 videos, where I could look at all the folks around her. I noticed how she got about as many looks from Chinese women as she did from Chinese men, and for about the same brief length of time, with no major facial reaction other than, at most, a small smile, never a frown. Many of the expats had the same behavior, though there were several very obvious exceptions who stared and leered, turning their bodies when their necks reached a limit.
After a while I finally started to understand something. Perhaps it's not the full picture, but I think Chinese and Americans view beauty, especially female beauty, in very different ways. It may come down to the perception of beauty itself.
For example, to a Westerner, a beautiful building, a beautiful garden, a beautiful song, and a beautiful woman are likely thought of as representing distinctly different kinds of beauty. To the Chinese, I believe they are seen as parts of a continuous whole, free of sharp distinctions, sharing more commonality than differences.
Western males judge women according to their perceived beauty, attributing to them attributes that are unrelated to appearance, such as personality or intelligence. Western women are not immune to similar judgments concerning each other and men.
I believe the Chinese view physical attributes as simply a means to recognize someone from a distance, and not as a representation of who they "are". The Chinese also view identity a bit differently, not residing entirely within the individual, but also being diffused into family, friends, associates and even society. To get to know someone in China I believe it must be just as important to spend time with others who know them in addition to individual time.
I believe it does come down to identity, both its definition and perception, particularly in how and when appearance becomes a factor. And, perhaps, how there is an intentional Chinese cultural emphasis on similarities over differences.
China is a communist country, a "People's Republic", that has been undergoing great social and economic upheavals over the past 40 years, causing stresses that, after a period of easing, now push the government to become more authoritarian, with increasingly invasive public and private monitoring. The underlying ethos was and is: "we are all in this together, and must work for the common good".
China is also a region with a long dynastic history massively dominated by the Han culture and race. In China, all of the non-Han taken together are a surprisingly small part of the population (under 10% of the total), with explicit government policies having the goal to absorb and diffuse formerly separate races and cultures into the Han-dominated society. An example of this is the ongoing government-supported Han migration into Tibet.
Taken together, these factors provide a context that encourages specific social traits, especially among the overwhelming Han majority. While Westerners may view some some of these traits with disdain, the simple fact is that equality is much more a default assumption within China, particularly among the Han. And I'm saying "more equal", not "totally equal": China still has many cultural stereotypes related to sex, age, and particularly race, but they are much less noticeable than the equivalent Western traits.
I believe this Chinese equality particularly extends to sexism and judgments based on appearance. For example, personal style is both accepted and appreciated in China, but not judged by its absence or extremeness. My perception is that fashion and style are much more about expression and entertainment rather than anything about identity.
A Western comparison may be our taste in music: We sometimes want to listen to Jazz, other times Pop, but our favorite may be Country. We seldom judge people by what they are listening to in the moment or by their general music tastes, at least not in any way close to how we judge people based on their appearance.
So, I've chosen to try to view the external physical beauty of people more like how I suspect the Chinese do, more like a beautiful song or flower, rather than something that should inflame my hormones.
And it's working!
But I must admit I did have a bit of a head start: Decades ago I was a semi-pro photographer (which means I took gigs only when I wanted a new piece of equipment). As a photographer, I saw whatever was in the viewfinder as part of the picture, something to be properly framed, lighted, and composed. This applied equally to people, places and objects. I was photographing beautiful things, but it was more about the beauty they shared, and abstract beauty. I took particular joy in revealing the beauty in things often not thought of as beautiful.
I gave up photography because I had let the camera isolate me from life on the other side of the lens. I had become increasingly shy in social situations. Things get quite bad before I realized there was a problem, getting to the point where I rarely when anywhere without my camera. I quit cold-turkey, which helped immediately, but only decades later did I realize I had also given up the equality of the viewfinder.
The more I try to see "beauty as beauty", the more I see the world as potential photographs.
When I see images of Naomi in minimal clothes, I find I now look first to see if a Maker project is also in the image. Because that is who Naomi is to me. See the list at the beginning of this post.
Don't get me wrong: I don't appreciate Naomi's physical beauty any less than I did before! I now appreciate it as part of the beauty of the greater whole; the Maker, the programmer, the model, and the many other attributes of Naomi Wu, SexyCyborg.
I also view those around me differently. I like having less of a Pavlovian response to attractive women, less being shy and tongue-tied in their presence, more interested in the rest of who they are. Most notably, this affects how I interact with female bar and restaurant staff, whom I now seem to adopt as sisters independent of their attractiveness.
And, finally, I must admit to the changes being ongoing and incomplete. For example, I have come to fully understand just how rude it is to openly stare at people. So I now do it covertly, behind sunglasses, from the corner of my eye, with my nose pointed straight ahead, with my face neutral.
My journey may not yet be complete, but I can at least try to act as though I'm further along the path. As most Shenzhen folks do.
One day, one step, one person at a time.
I always thought of myself as an unbiased person, free from common prejudice. But Naomi arrived like a stick in my eye, jumbling my perceptions, causing me to uncomfortably flip between "Wow, cool Maker" and "Wow, hot woman" as if they were two different things.
I can't count the times Naomi has made very clear the differences between how people in Shenzhen respond to her appearance compared to Western males. The charming videos with kids and "Aunties" were one thing, but the lack of drooling, leering looks from Shenzhen males when she walked in public finally made the point clear to me. The only leering looks I can recall in any of her videos came primarily from the Western expats at her pool party modeling gigs.
So, what's the difference between Shenzhen men and Western men? Is there a difference I can find, understand, learn from, and put to good use? Well, I'm far from Shenzhen, and don't speak either Mandarin or Cantonese, so direct research is difficult. I started by rewatching Naomi's videos, and well as videos by other Asian vloggers, both locals and expats.
I was most impressed with the videos by Western expats who had chosen to live in China long-term; had built a career; had married a local; had started a family. How their videos changed from the earliest to the most recent. And how they and their spouses reacted during trips to the West.
Then I viewed Naomi's videos again, especially her 360 videos, where I could look at all the folks around her. I noticed how she got about as many looks from Chinese women as she did from Chinese men, and for about the same brief length of time, with no major facial reaction other than, at most, a small smile, never a frown. Many of the expats had the same behavior, though there were several very obvious exceptions who stared and leered, turning their bodies when their necks reached a limit.
After a while I finally started to understand something. Perhaps it's not the full picture, but I think Chinese and Americans view beauty, especially female beauty, in very different ways. It may come down to the perception of beauty itself.
For example, to a Westerner, a beautiful building, a beautiful garden, a beautiful song, and a beautiful woman are likely thought of as representing distinctly different kinds of beauty. To the Chinese, I believe they are seen as parts of a continuous whole, free of sharp distinctions, sharing more commonality than differences.
Western males judge women according to their perceived beauty, attributing to them attributes that are unrelated to appearance, such as personality or intelligence. Western women are not immune to similar judgments concerning each other and men.
I believe the Chinese view physical attributes as simply a means to recognize someone from a distance, and not as a representation of who they "are". The Chinese also view identity a bit differently, not residing entirely within the individual, but also being diffused into family, friends, associates and even society. To get to know someone in China I believe it must be just as important to spend time with others who know them in addition to individual time.
I believe it does come down to identity, both its definition and perception, particularly in how and when appearance becomes a factor. And, perhaps, how there is an intentional Chinese cultural emphasis on similarities over differences.
China is a communist country, a "People's Republic", that has been undergoing great social and economic upheavals over the past 40 years, causing stresses that, after a period of easing, now push the government to become more authoritarian, with increasingly invasive public and private monitoring. The underlying ethos was and is: "we are all in this together, and must work for the common good".
China is also a region with a long dynastic history massively dominated by the Han culture and race. In China, all of the non-Han taken together are a surprisingly small part of the population (under 10% of the total), with explicit government policies having the goal to absorb and diffuse formerly separate races and cultures into the Han-dominated society. An example of this is the ongoing government-supported Han migration into Tibet.
Taken together, these factors provide a context that encourages specific social traits, especially among the overwhelming Han majority. While Westerners may view some some of these traits with disdain, the simple fact is that equality is much more a default assumption within China, particularly among the Han. And I'm saying "more equal", not "totally equal": China still has many cultural stereotypes related to sex, age, and particularly race, but they are much less noticeable than the equivalent Western traits.
I believe this Chinese equality particularly extends to sexism and judgments based on appearance. For example, personal style is both accepted and appreciated in China, but not judged by its absence or extremeness. My perception is that fashion and style are much more about expression and entertainment rather than anything about identity.
A Western comparison may be our taste in music: We sometimes want to listen to Jazz, other times Pop, but our favorite may be Country. We seldom judge people by what they are listening to in the moment or by their general music tastes, at least not in any way close to how we judge people based on their appearance.
So, I've chosen to try to view the external physical beauty of people more like how I suspect the Chinese do, more like a beautiful song or flower, rather than something that should inflame my hormones.
And it's working!
But I must admit I did have a bit of a head start: Decades ago I was a semi-pro photographer (which means I took gigs only when I wanted a new piece of equipment). As a photographer, I saw whatever was in the viewfinder as part of the picture, something to be properly framed, lighted, and composed. This applied equally to people, places and objects. I was photographing beautiful things, but it was more about the beauty they shared, and abstract beauty. I took particular joy in revealing the beauty in things often not thought of as beautiful.
I gave up photography because I had let the camera isolate me from life on the other side of the lens. I had become increasingly shy in social situations. Things get quite bad before I realized there was a problem, getting to the point where I rarely when anywhere without my camera. I quit cold-turkey, which helped immediately, but only decades later did I realize I had also given up the equality of the viewfinder.
The more I try to see "beauty as beauty", the more I see the world as potential photographs.
When I see images of Naomi in minimal clothes, I find I now look first to see if a Maker project is also in the image. Because that is who Naomi is to me. See the list at the beginning of this post.
Don't get me wrong: I don't appreciate Naomi's physical beauty any less than I did before! I now appreciate it as part of the beauty of the greater whole; the Maker, the programmer, the model, and the many other attributes of Naomi Wu, SexyCyborg.
I also view those around me differently. I like having less of a Pavlovian response to attractive women, less being shy and tongue-tied in their presence, more interested in the rest of who they are. Most notably, this affects how I interact with female bar and restaurant staff, whom I now seem to adopt as sisters independent of their attractiveness.
And, finally, I must admit to the changes being ongoing and incomplete. For example, I have come to fully understand just how rude it is to openly stare at people. So I now do it covertly, behind sunglasses, from the corner of my eye, with my nose pointed straight ahead, with my face neutral.
My journey may not yet be complete, but I can at least try to act as though I'm further along the path. As most Shenzhen folks do.
One day, one step, one person at a time.
Subscribe to:
Posts (Atom)